...
| Section |
|---|
| Column |
|---|
|
| Panel |
|---|
| borderColor | #e0e0e0 |
|---|
| bgColor | #f0f0f0 |
|---|
| title | In this section: |
|---|
| |
| Widget Connector |
|---|
| url | https://vimeo.com/174603702 |
|---|
|
|
| Column |
|---|
|
| Info |
|---|
Things to fix: - Fix the file path in the Alembic_In node to a proper relative one.
- Fix bug in DlSettings UI where the primary layer is drawn as selected, but the rest of the UI (i.e. multi-light) is not.
- Revise rendered look - with proper colour management, things look washed and dull.
- Re-do the multi-layers image with a layout more like the one in the 3dfm multi-light page, with proper layer naming.
- Estimate the overhead of rendering the multi-light image.
- Should implement "Environment" item in Multi-Light list in Katana.
- Should add the "Display All Lights" toggle under the Multi-Light list.
- Should add the "Visible to Camera" attribute on area lights so we can control if the light box itself is visible in the rendered image.
|
|
|
This tutorial illustrates how to render multiple light layers at once using 3Delight for KATANAKatana, and how this kind of rendering can be used in 3Delight Display to interactively adjust the scene light intensities. In this context, the modifications are instantly shown in the rendered image and are applied in on the scene light sources by KATANAKatana. The scene Katana project is available as a small package file here.
...
The layers of a multi-light image. Rendering such an image requires about 12% more time than rendering the RGBA "beauty" layer alone.
Rendering a multi-light image in
...
Katana
| Section |
|---|
| Column |
|---|
|
| Panel |
|---|
| borderColor | #e0e0e0 |
|---|
| bgColor | #f0f0f0 |
|---|
| In the Node Graph, right-click on the DlSettings node and choose Show Parameters in Floating Pane. Katana Preferences, make sure that the 3Delight Render View preference is is to either 3Delight Display or Both.
 Image Added Image Added
This will ensure that 3Delight Display is launched upon rendering. We are going to use its Mixer feature a bit later.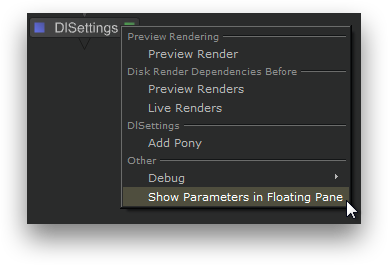 Image Removed Image Removed |
| Panel |
|---|
| borderColor | #e0e0e0 |
|---|
| bgColor | #f0f0f0 |
|---|
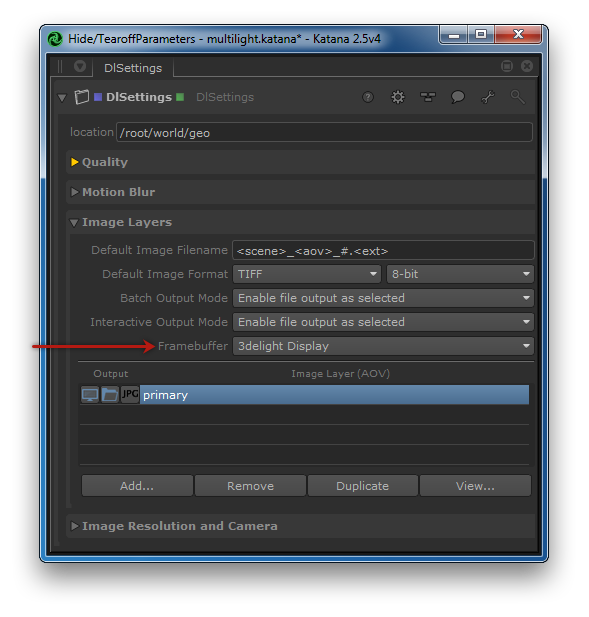
| In the Image Layers section, make sure that Framebuffer is set to 3Delight Display.
|
| Panel |
|---|
| borderColor | #e0e0e0 |
|---|
| bgColor | #f0f0f0 |
|---|
| Click on the primary image layer to display its Multi-light settings. In the Multi-Light section, select the light layers to be rendered.
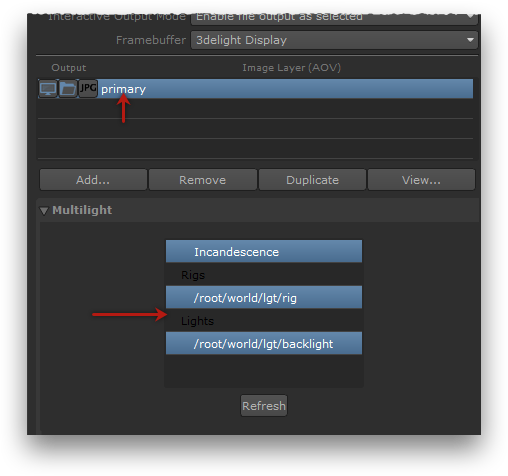
In this sample scene, the key lights are grouped in a rig. Rigs get their own entry multi-light list; selecting one rig in that list will render a layer containing all of the rig's lights. Independent lights are listed under the Lights section. |
| Panel |
|---|
| borderColor | #e0e0e0 |
|---|
| bgColor | #f0f0f0 |
|---|
| Right-click the DlSettings node in the Node Graph and select Preview Render.

3Delight Display will open and show the rendering as it progresses. |
| Panel |
|---|
| borderColor | #e0e0e0 |
|---|
| bgColor | #f0f0f0 |
|---|
| In 3Delight Display, display the contact sheet by double-click the layers icon in the Thumbnail View.

The Contact Sheet can also be displayed by choosing View → Contact Sheet. All rendered layers are shown. You can see one layer per entry picked in the Multi-light list, in addition to the primary RGBA layer. Pick any layer to display it in full size by clicking on it. You can also use the page up and page down keys to cycle through the layers. Select the primary RGBA layer to continue. |
|
|
...