| Excerpt Include | ||||||
|---|---|---|---|---|---|---|
|
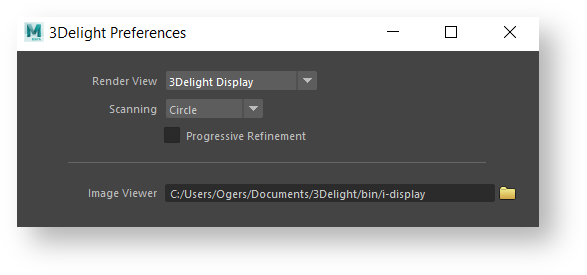
The 3Delight Preferences Dialog
| Excerpt Include | ||||||
|---|---|---|---|---|---|---|
|
Image Viewer
The Image Viewer option specifies the location of the applications that will be launched to view images. The default application is 3Delight Display
The 3Delight Preferences dialog offers options for a user to configure per his or her personal preference. As such, these settings:
- Are independent of the Maya scenes/projects? the user is working on.
- Are effective across all Maya scenes/projects? the user is working on.
- Have no effect on the resulting image from the rendering process (i.e. they do not affect the project a user is working on).
All the preferences liste here, including the Render Engine preferences, are ignored during batch rendering (i.e. when using Maya Batch).
The Render Engines Tab
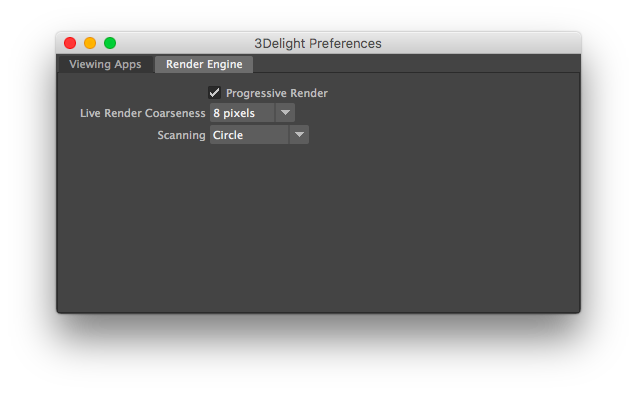
Live Render Coarseness
In order to provide a quick feedback and allow interactive manipulations, 3Delight's live renders always start with a very coarse image and refines its quality through a few iterations, each iteration taking increasingly more time. The Live Render Coarseness option simply enables you to select the lowest quality (coarseness) the live renders starts with. More coarseness (larger pixels) provides faster frame rate during interactive manipulation at the expense of quality. The available options are 8, ?, ?, ? pixels. The default is 8 pixels, favouring interactive responsiveness (particularly during camera manipulation).
Scanning
An image is rendered gradually in small groups of pixels called buckets. This option allows you to specify in what order the buckets are rendered. It applies to both normal and live renders. The default scanning is ????????. The available options are:
...
Progressive Render
This options applies during normal renders only. It does not apply to Live Render (IPR); a separate rendering technique which is progressive in nature and allows interactive manipulations. For normal renders, when this toggle is turned on, the rendering rapidly starts with a noisy image and refines it progressively until completed. Progressive Render has a slight overhead and may increase render time in the order of 5-10%.
| Warning |
|---|
When using Progressive Render, the Filter Type and Filter Width attributes (specified in the Quality group of the Render Settings) are ignored. A Box filter with a width of 1 is used instead. Also, images rendering with this option may contain more noise / fireflies. Because of this, these images may differ slightly from final renders using Maya Batch (remember that when using Maya Batch, progressive is ignored). Make sure to deactivate Progressive Render when rendering final frames. |
The Viewing Apps Tab
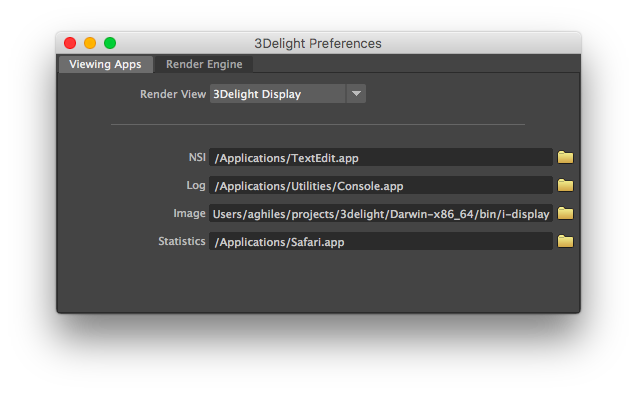
The first section of this tab contains the Render View option for selecting the window (and application) in which image layers will be displayed on screen during rendering. See Image Layers (AOVs). It can be either the Maya Render View, 3Delight Display or Custom Frame Buffer. When the latter is selected, the render view used for rendering is specified through the 3deliht.config file. 3Delight Display is used by default.
...
| title | ???? This need to be revised.... |
|---|
...
The following statement in the 3deliht.config file controls which render view is used when Render View is set to Custom Frame Buffer:
| Code Block |
|---|
# default framebuffer is the i-display application.
/displaytype/framebuffer idisplay |
The second section of this tab specifies the location of the applications that will be launched to visualize the different types of data sets/files specified in various 3Delight for Maya fields. The supported types of applications are listed in the table below.
...
This application will be launched to view rendering log files. The default application is WordPad on Windows and Console on Mac OSX. There is no default application on Linux.
...
.