Overview
Using the Image Layers group of attributes the user specifies one or several layers of images to output simultaneously from the rendering process. Each can be set to be displayed on screen (in a window) or be saved to in a file or both. By default, the Image Layers group of attributes is setup to output only one image layer: the RGBA components representing the main image, also commonly referred to as the Beauty. And it is setup to be outputted displayed on screen and saved in a file.
It is possible to add any number of layers, each set to output any complementary values information to the Beauty image. These are derived from variables , such as:
- Variables computed inside shaders
- , commonly called Arbitrary Output Variables (AOVs)
- , such as depth values associated to the Beauty image, original color of surfaces (without the effect of the lighting), the specular and diffuse shading components of the Beauty image. Refer to AOV Selector for further details on supported AOVs and how to define custom ones.
- Contribution of individual or group of lights to the Beauty image.
- Any number of arbitrary masks derived from objects and/or materials.
Such These layers can be useful for compositors to have many options while composing the final image . Refer to Supported AOVs for further details on supported AOVsand/or rapidly establishing the right light balance.
Layers can not only be generated using for different AOVs, Lights and Masks, they can also:
- From Have different camera angles. This is very powerful useful for fast simultaneous multi-camera rendering (for 3D stereo for example).
- Contain a different subset of objects in the scene. These are more advanced options and are described in the Layers Advanced.
| Info |
|---|
All the layers are rendered simultaneously. Adding many layers do not generally increase rendering time significantly. This is different and not to be confused with the 3Delight for Maya functionality of Render Passes. Those are processed sequentially and can produce totally different output from one pass to another. |
| Warning |
|---|
Windows only: Writing to disk many Image Layers may result in a performance bottleneck on Windows file systems. This is not the case on more efficient file systems such as Linux (ext4) and MacOSX (hfs+). |
| Tip |
|---|
Multi-Layer EXRs: to write all Image Layers in the same EXR file, simply set the exact same Image Filename. In the screenshot below this would imply removing the
|
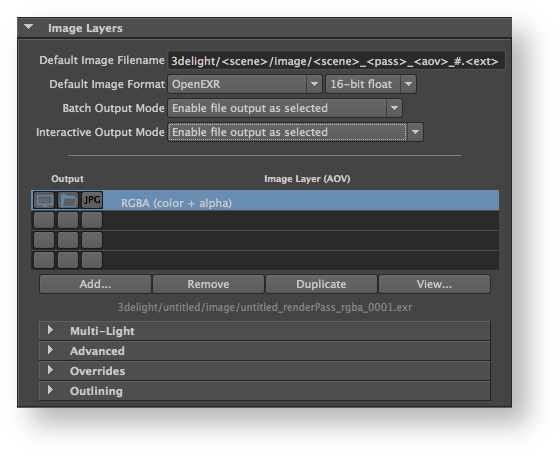

The Image Layers group
Global Options
Default Image Filename
Specifies the default file location for the image layers. By default, the location is based on the scene name, the render pass name and the AOV name. See File Path Expressions for details on how it is possible to construct relative paths and paths containing dynamically expanded tokens.
Default Image Format
Specifies the default file format for the image layers, including the pixel bit depth. The default is 816-bit TIFF float EXR files. Many formats are supported and each have specific requirements as to what options for bit depths are supported. Refer to Image File Formats for more details.
Batch Output Mode
Each image layer (AOV) have an a file output toggle controlling wether it should be saved to file during rendering (this is explained in details in the following sectionbelow). Since these toggle toggles may be manipulated frequently while working interactively and they may be forgotten in a OFF position while when sending the rendering on to a render farm (using the Maya Batch command line), the Batch Output Mode controls wether these toggles should be ignored (overridden) when rendering in batch mode. This option is useful to make sure all image layers are saved when rendering using the Maya Batch command line, regardless of the status of the file output toggle. The options are:
Enable file output as selected | Indicates to output the image |
| layers to file (in batch mode) only if |
| their corresponding file output toggle |
| are selected. This is the default |
| , it follows the same behaviour as in interactive mode. | |
Enable all file output and selected JPEG | Indicates to ignore (override) the file output |
| toggles and request that all image layers be saved to file when in batch mode. With regard to the |
| output of a JPEG file, only those that are selected will be |
| output to file (meaning the Batch Output Mode have no overriding effect to the JPEG output toggle and those are |
| output only if enabled, wether in batch or interactive mode). |
Interactive Output Mode
Each image layer (AOV) have a toggle controlling wether it should be saved on file or not (this is explained in details in the following section). The Interactive Output Mode allows to globally control the behaviour of the file output toggles while working during an interactive session. The options are:
| Section | ||||||||||||||||||||||||
|---|---|---|---|---|---|---|---|---|---|---|---|---|---|---|---|---|---|---|---|---|---|---|---|---|
|
List of Layers (AOVs)

The second section of the Image Layers group is use to specify the list all the layers that will be generated during the rendering process (subject to the selection of any of the three output toggles in te list). By default, the list is populated with only one image layer, the RGBA ("Beauty") layer. When there are many layers, it is possible to re-order them in the list for organisational purpose (to visually group them). This is done through a middle-click and drag. It is a bit finicky to use though - you need to drop the layer while a line in between two layers is highlighted for the re-order to work. If you drop the layer while another layer is highlighted, nothing happens.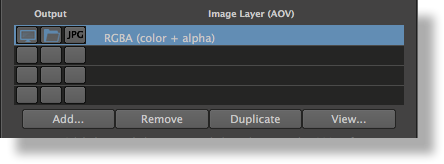
List of Layers (AOVs)
and additional layers can be added. Each layer can be selected to be displayed on screen and/while rendering or be saved to file or both. They can be saved in the specified format and also simultaneously in JPEG (similar in concept to a digital camera where one that can select to save simultaneously a RAW image and /or a JPEG image). The output These outputs (display on screen and save to file) for each layer is controlled using the the three toggles present at the beginning of each layer in the list:
located left of the layer name in the list. If no output toggles are selected, the image layer with its AOV is inactive.
| Section | ||||||||||||||||||||||||||||
|---|---|---|---|---|---|---|---|---|---|---|---|---|---|---|---|---|---|---|---|---|---|---|---|---|---|---|---|---|
|


If all three toggles are selected, the image layer will be outputted simultaneously in a screen window, on file (in the specified format) and as a jpeg. If none are selected, the image layer is inactive.
Below the list of layers there are four buttons. Except for Add, their function applies to the selected layers in the list:
Add...
For adding layers. A separate dialogue The AOV Selector will pop for selecting the AOV for that layer.
enabling one or more AOVs. All the AOVs selected in the AOV Selector
and pressing OK, the ones already present in the list of Layer (AOV) are removed. As a temporary work around, simply make sure you select these AOVs you have already present in your list of layers (AOV) in the AOV Selector before you press OK. This way they will remain. (You can make multiple selections in the AOV Selector using theare presented in the list of layers.
Remove
Select one or more layers in the list and press Remove to remove
modifier keys).
Remove
Select a layer (AOV) in the list to remove it. Note that the RGBA ("Beauty") layer can not be removed.
Duplicate
Select a layer (AOV) in the list and press Duplicate to duplicate it. You can then change some of the per layer attributes for any of the duplicated layer (otherwise you simply end up with exactly the same Layer/AOV without any differences to itdifference). For example, you can have two Diffuse layers saved in different file format, or each with a different Pixel Filter or Display Subset (specified in the Advanced groups of attributes).
View...
Select a layer (AOV) and press View to view it. This opens the Image Filename for hat that layer in a viewing application. Refer to The 3Delight Preferences for how to select which application should be launched.
Per Layer Attributes
When selecting a layer (only one) in the list of layers, the following list of attributes are availableits attributes are listed in collapsable groups below the Add/Remove/Duplicate/View buttons. These are per-layer attributes. Advanced collapsable layout. Refer to the Layers Advanced for a description of these advanced attributes.
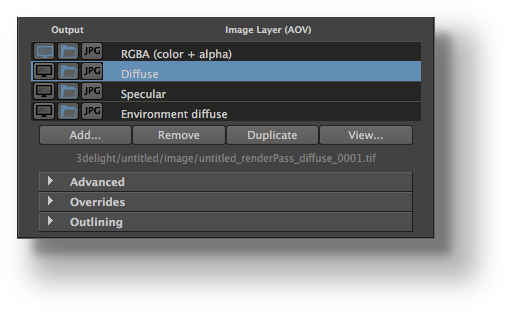
The expanded file name for the selected layer is shown just above these collapsable groups.
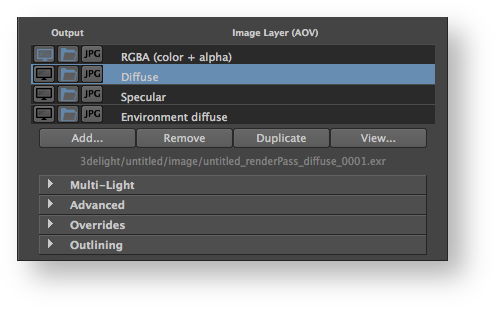 Groups Group of attributes for a specific Layer
| Collapsable Group | Description |
|---|---|
| Multi-Light | See Layers Multi-Light. |
| Multi-Mask | See 3Delight Multi-Mask. |
| Advanced | See Layers Advanced. |
| Overrides | This group is to override the following attributes for the selected layer: Image Filename |
...
Use to override |
...
the Default Image Filename. The options are "Default" to use (not override) |
...
the Default Image Filename |
...
and "Custom" to |
...
specify a custom filename for the selected layer. When default is selected, the complete expanded filename is listed just below (expanded from the token). File Format To override |
...
the Default |
...
Image Format. The options are "Default" to use (not override) |
...
the Default Image Format and "Custom" to |
...
specify a custom file format, including the |
...
| Section | ||||||||||
|---|---|---|---|---|---|---|---|---|---|---|
|
| Section | ||||||||||||
|---|---|---|---|---|---|---|---|---|---|---|---|---|
|
Bit Depth
Specifies how many bits to use per layer component. The available bit depth values are:
| Section | ||||||||||||
|---|---|---|---|---|---|---|---|---|---|---|---|---|
|
...
pixel bit depth.
| ||
| Outlining | See Layers Outlining |
| Column | ||
|---|---|---|
| ||
|
...
| width | 99% |
|---|
...
All images are rendered internally in 32-bits float format. Quantization is the process of assigning integer values to these floating-point values. Some usual preset values are available in the Bit Depth attribute. If they do not include the needed variation, it is possible to specify custom quantization values by selecting this menu entry. Upon selection, a dialog pops up, displaying the current bit depth settings. It allows specification of values for Zero, One, Min, Max and Dither amplitude. Zero is the black point, while One is the white point. These two values can be different from the Min and Max values if you need to have under-exposed or over-exposed values. An example set of values for 12 bits output with standard dithering would be: 0, 4095, 0, 4095, 0.5 An example set of values for 16 bits output with a white point at 4K that prevents over-exposed pixels from being clamped to the white value, would be: 0, 4095, 0, 65535, 0.5
...
| . |