This section specifies what image In this section users can specify what AOV will be output by the renderer . The image can either be saved to a file or displayed in a framebufferand to what file or frame buffer. By default, a render pass is created with one display. However, it is possible to create several distinct displays in a single render pass.
It is sometimes necessary to output more than just RGBA components during a render. For example, it might be useful to also output the depth (or z) value for each pixel for later processing.
2 These parameters will respect the value set for ‘Shutter Angle’ in Maya’s camera properties.
allowed to add any number of additional display and output any AOV (Arbitrary Output Variable) that are declared in the shaders.
It is allowed to add any number of additional display and output any AOV (arbitrary output variable) that are declared in the shaders (refer to 3Delight User’s Manual for more information on AOVs).
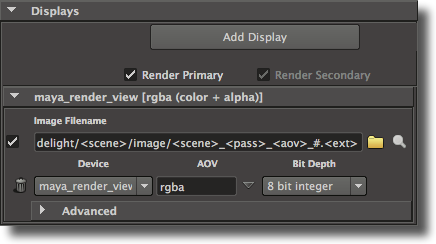
Each display is shown in its own panel. To add a display, either click on the Add Display button, or select
Add Display
in the contextual popup menu that appears when right-clicking almost everywhere in the Displays
section. This menu also offers options to expand or collapse all display panels at once. To remove a display, click on its Remove Display button, which appears as a trashcan. To duplicate a display, right-click anywhere above the display to duplicate and select Duplicate Display menu option.
At the top of the Displays
section are a few general controls, followed by a list of per-display panels. The general controls are:
Add Display
Clicking this button will add a new display attribute group at the bottom of the displays panel.
Render Primary Display
Controls if the primary display is going to be rendered. The primary display is always the display at the top of the displays panel and this control is tied to the first display’s Render toggle. It can be useful to turn this option off when you need only need to render a secondary display or shadow maps. By default, this toggle is on.
Render Secondary Displays
Specifies if the other displays than the first one are rendered. This toggle will override the per-display Render toggle. This control is on by default.
Each display has its own panel showing the basic display parameters on two rows. The remaining display attributes are located in the
Advanced section. A display panel’s first row offers the following attribute:
A Render toggle
Controls if the display will be rendered or not. Since the first display in the panel is considered the primary display, its Render toggle is tied to the Render Primary toggle. For other displays, their Render toggle is acknowledged only when Render Secondary is turned on.
An Image Filename
This control specifies the file name of the rendered image. When using a framebuffer display driver, this specifies a window title. By default, a file name based on the scene name and render pass name is created. See Section 5.5.4 [File Path Expressions],
Chapter 3: The User Interface 54
page 124 for details on how it is possible to construct relative paths and / or paths containing dynamically expanded tokens.
...
A Browse for Image File button
...
This button, drawn as a folder, brings up a file browser to specify an image filename.
...
A View Image button
...
This button, drawn as a magnifying glass, will open the display’s image file in a viewing application. See Section 3.17 [The Preferences Window], page 93 for details on how to specify which application should be launched.
The second row offers the following attributes:
...
A Remove Display button
...
This button, drawn as a trashcan, removes the display from the render pass.
...
Display Driver
...
This options specified the type of the display driver, which is where your rendered image will go. The following display drivers are available:
...
‘framebuffer’
The rendered image is displayed in a basic window.
| Display Name | Description |
|---|---|
| idisplay |
| The rendered image is |
| sent to i-display |
| maya_render_view |
The rendered image is displayed in |
Maya’s Render View. Note that this display driver should not be used when rendering to |
a RIB file since it only works for rendering launched in Maya |
by 3Delight For Maya. |
| tiff |
| The |
| AOV is |
| saved in |
| TIFF format |
| iff |
| The |
| image |
| /AOV is saved in IFF format. Note that only 8 |
| bits RGB or RGBA images can be output by the IFF display driver. |
| exr |
The rendered image/AOV is output in a file in |
"Open EXR" format. The |
Open EXR libraries, which are not included in |
the 3Delight |
package, must be |
installed. This display driver only works in |
16-bits float |
or |
32-bits float |
. |
| cineon |
| The rendered image is output in a file in Cineon format. It is |
| recommended to set the |
| Bit Depth |
| 32 bit float |
| . |
| zfile |
The rendered AOV will be a depth map file. It is recommended to set the bit depth to 32 bit float. The AOV in this case should be set to ‘z’. | |
| eps |
| The rendered image is output in a file in |
| Encapsulated PostScript format. |
| bmp |
| The rendered image is output in a file in |
| BMP format. |
| psd |
| The rendered image is output in a file in PSD format. |
| radiance |
The rendered image is |
saved in |
Radiance format. This display driver |
only works in |
32 |
bits float |
. | |
| null | The rendered image is discarded. |
Chapter 3: The User Interface 55
| shadowmap |
...
The rendered image will be a depth map in TIFF format, suitable to be used as a shadow |
...
map. Bit Depth has to be set to 32 bit float and the AOV to 'z'. |
Texture |
| The rendered image will be a mipmap TIFF, suitable to be used as a texture map without the need of converting it with tdlmake. |
...
‘dsm’
...
The rendered image will be a deep shadow map. The deep shadow map display driver has several restrictions: the "Bit Depth" attribute should be set to
...
‘32 bit
...
float’, the "Output Variable" should be set to
...
‘rgba’, the required "Pixel Filter" is
...
‘box’ and the required "Filter Width" is
...
‘1 x
...
1’. The "resolution" must have equal values in both width and height, and this value should be a power of two.
‘jpeg’ The rendered image is output in a file in JPEG format.
‘pic’ The rendered image is output in a file in Softimage’s PIC format.
‘png’ The rendered image is output in a file in PNG format.
Detailed information on each display driver is available in the 3Delight User’s Manual. By default, ‘idisplay’ is the selected primary display driver.
‘Output Variable’
Indicates what variable will be output during this render. The most common values are ‘rgba’ or ‘rgb’ for RGBA and RGB outputs respectively. You can specify here any predefined output variable or arbitrary output variables that your shaders are using. Inline declarations of arbitrary output variables are allowed, meaning that it is permitted to preceded a variable name with its type to declare it and specify it for the display mode all at once. Right-clicking on the text field brings up a popup menu that lists available predefined output variables. The available values that are relevant regardless of the shaders assigned of to scene elements are:
‘[user specified]’
This item is selected when a custom variable name is typed in the text field.
‘z [depth]’
For a given pixel, this variable outputs the distance between the camera and the object visible at this pixel. It is recommended to set the "Bit Depth" to ‘32-bit float’; refer to [Bit Depth], page 58.
‘rgb [color]’
This variable outputs the color information of the rendered image.
‘a [alpha channel]’
This variable outputs the transparency information of the rendered image.
‘Oi [3-channel alpha]’
This variable outputs the R, G and B transparency information of the rendered image.
‘rgba [color + alpha]’
This variable outputs the color and transparency information of the ren- dered image. This is also called a beauty render pass. This is the default.
...