In this test scene, the colors on the left object are picked using Maya's color swatch and the right colours are projected using a texture. Thanks to color management, the colours match perfectly even though the colours came from different sources. You can download the example scene here.
3Delight for Maya provides a complete linear workflow pipeline. This pipeline is unique in that is allows for a predictable behaviour across all visual elements:
- Automatic conversion of Input Textures based on a global color profile setting.
- Automatic conversion of HydperShade color swatches. No need to insert any additional nodes (such as Maya gamma nodes) to put the swatch in the correct color profile.
- Automatically recognizes what is supposed to be color corrected and what is not. For example, 3Delight for Maya automatically uses linear color space for "non-color" data such as bump and displacement maps.
- Total consistency between the viewport, color swatches, frame buffer (
i-display) and shader preview.
Enabling Color Management
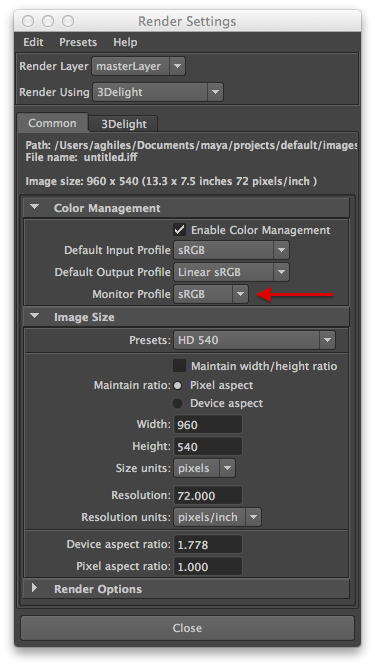
To enable color management, simply enable Color Management in the Common tab of the Render Settings. The standard Maya settings are supported:
Default Input Profile
Specification of the default color space for input textures and color swatches. You should choose an appropriate profile based on the color profile used in the majority of your input textures. For any texture which is not following this rule you should override the collar profile on a case by case basis, in the Maya File Texture node color profile settings.
Default Output Profile
Specification of the default color space for output images.
In addition to these two parameters, 3Delight for Maya lets you specify another very important color space:
Monitor Profile
Specifies the color space of the monitor on which lighting or surfacing work is performed. Having the correct profile of your monitor is a useful (even necessary) additional control. In fact, by knowing the color profile of your monitor 3Delight for Maya can automatically apply the necessary corrections to the color swatches of Attribute Editor.
Monitor Profile attribute is added when 3Delight is selected as the render engine.
Note that the Default Input Profile is used for textures only. Textures created in PhotoShop are usually in the sRGB color space and the majority of monitors are sRGB swell. Some monitors are calibrated for REC.709, which is the broadcasting color standard for high definition television (HDTV). Lighters working on such monitors can just switch the Monitor Profile to REC.709.
Color Management in the File Node
Most texture files are created/painted in Photoshop. This means that the most probable color space for these textures is sRGB. The most convenient way of setting the color space when the majority of textures come from Photoshop is to set the global Default Input Profile to sRGB and to set the Color Profile attribute of the File node to "Use Default Input Profile" (which is the default setting).
Assuming the majority of your textures are in sRGB color profile,that you have enabled color management and chosen such compatible settings for your input textures, you still need to be careful as you might have a minority of textures of a different color profile. For any texture which is not following the majority rule you should override the color profile on a case-by-case basis, in the Maya File Texture node color profile settings.
A good example is the texture used as environment used in the delightEnvironment node selected in the renderPass, which is typically of linear color profile (being of HDR or EXR format): if your input color profile is set to sRGB and you are using an HDRI image as environment, you must to override its file node color profile to "linear".
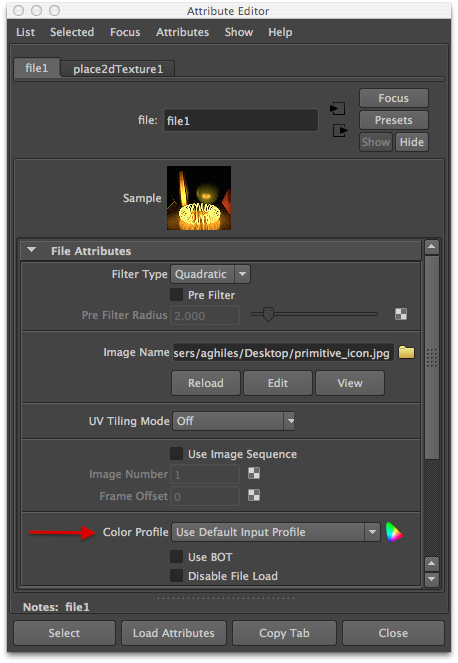
Color Profile selection in the File Node
Color Management in the Viewport
Compared to previous Maya versions, in Maya 2015 it is possible to have a better color balance in the viewport by setting the Gamma of the Viewport 2.0 to 2.2.
Setting the gamma to 2.2 is a poor approximation to an sRGB profile. That is why it is incorrect to say that Maya has color management in the viewport. None the less, it is better to use a gamma of 2.2 rather than using a linear profile (with no gamma correction).
To set the gamma, select Viewport 2.0 and enable gamma correction in the Hardware Renderer 2.0 Settings, as show below.

Enable Viewport 2.0
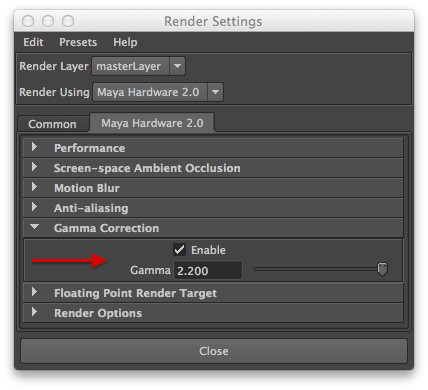
Enable gamma correction and set Gamma to 2.2
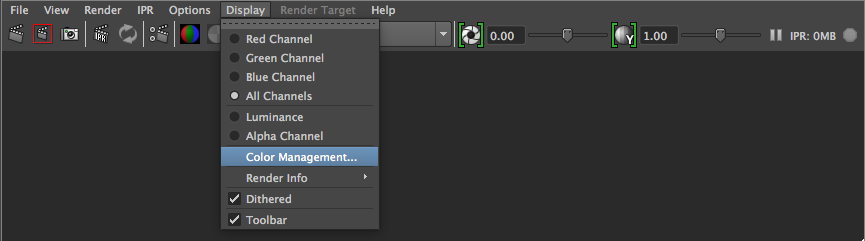
Color Management in i-Display
i-Display is the recommended display application when rendering with 3Delight, it offers higher accuracy, performance, ability to inspect all additional Image Layers / AOVs and many advanced features like the light mixer. When rendering in i-Display it is possible to specify the viewing color profile according to your monitor, by default colors are covered from Linear to sRGB being the most common case, you can also choose REC.709 or any custom LUT.
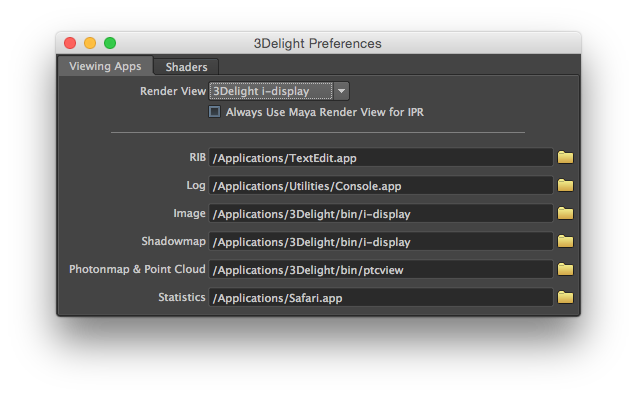
Chose to render in i-Display (from 3Delight for Maya Preferences)

Choose color Profile in i-Display
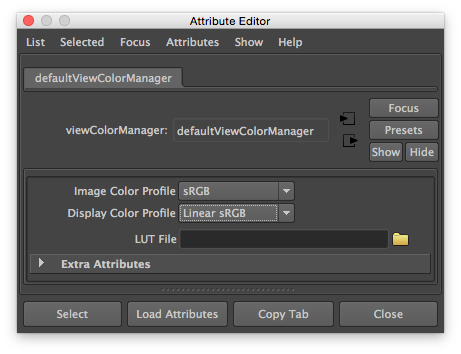
Color Management in the Maya Render View
Compared to previous Maya versions, in Maya 2015 it is possible to have a better color balance in the Maya Render View by setting the Display Color Profile to linear sRGB. In general the accuracy is not perfect and we strongly recommend to render in i-Display.
Color Management in the Attribute Editor
To be continued...
1 Comment
Paolo Berto