In this example we will demonstrate how you can write your own shader node using the RenderMan Shading Language that is fully working within Softimage Render Tree, without the need of any SDK or compilation tools. This simple shader will be based on a lambertian model with AOV channels for "ambient", "raw diffuse" and albedo. You will also be able to choose the shading color (image connection will be possible). If you are too impatient, you see a video that shows how this shader is created and debugged live in Softimage's render view.
To fully understand this tutorial, you will need some scripting knowledge (in this case Python) and some basic knowledge of the Softimage SDK. But you do not need any compiler or developer's SDK installed, everything you need is in the 3Delight for Softimage package.
Create the Softimage Render Tree node:
The very first thing to do, is to register your own shader. In order to do that, you have to create a new python file. This file should contain the following lines of code:
Softimage - Register a shader
from win32com.client import constants

def XSILoadPlugin( in_reg ):
 in_reg.Author = 'gducatel'
 in_reg.Name = 'my_shader'
 in_reg.Major = 1
 in_reg.Minor = 0
 in_reg.Help = 'https://3delight.atlassian.net/'

 in_reg.RegisterShader( 'Lambertian', 1, 0 )

 return True

def XSIUnloadPlugin( in_reg ):
 strPluginName = in_reg.Name
 return True
This will register a shader called "Lambertian" inside the Softimage Render Tree. When this is done, you need to setup your interface in order to give options to both the end user and the renderer. In our case we will use two RGB color values: one for the ambient color (default is black) and one for the main diffusion color (default is a 50% grey).
To do that you need to add the following lines of code to the previous file:
Softimage - Shader Definition
def my_shader_Lambertian_1_0_DefineInfo( in_ctxt ) :
 '''
 SDK: http://download.autodesk.com/global/docs/softimage2014/en_us/sdkguide/si_cmds/cb_Shader_DefineInfo.html
 '''
 in_ctxt.SetAttribute( 'Category', 'My Shaders/Diffusion')
 in_ctxt.SetAttribute( 'DisplayName', 'Lambertian' )
 return True


def my_shader_Lambertian_1_0_Define( in_ctxt ) :
 '''
 SDK: http://download.autodesk.com/global/docs/softimage2014/en_us/sdkguide/si_cmds/cb_Shader_Define.html
 '''
 shaderDef = in_ctxt.GetAttribute( 'Definition' )

 shaderDef.AddShaderFamily( constants.siShaderFamilyTexture )

 # Input Parameter: i_ambient_color
 paramOptions = XSIFactory.CreateShaderParamDefOptions( )
 paramOptions.SetLongName( 'Ambient Color' )
 paramOptions.SetAnimatable( True)
 paramOptions.SetTexturable( True )
 paramOptions.SetInspectable( True )
 paramOptions.SetHardLimit( 0.0, 10.0 )
 paramOptions.SetSoftLimit( 0.0, 1.0 )
 paramOptions.SetDefaultValue( [0.0,0.0,0.0] )
 params = shaderDef.InputParamDefs
 params.AddParamDef( 'i_ambient_color', constants.siShaderDataTypeColor3, paramOptions )
 # Input Parameter: i_color
 paramOptions = XSIFactory.CreateShaderParamDefOptions( )
 paramOptions.SetLongName( 'Color' )
 paramOptions.SetAnimatable( True)
 paramOptions.SetTexturable( True )
 paramOptions.SetInspectable( True )
 paramOptions.SetHardLimit( 0.0, 10.0 )
 paramOptions.SetSoftLimit( 0.0, 1.0 )
 paramOptions.SetDefaultValue( [0.5,0.5,0.5] )
 params = shaderDef.InputParamDefs
 params.AddParamDef( 'i_color', constants.siShaderDataTypeColor3, paramOptions )

 # Output Parameter: o_result
 paramOptions = XSIFactory.CreateShaderParamDefOptions()
 paramOptions.SetLongName('Result')
 params = shaderDef.OutputParamDefs
 paramDef = params.AddParamDef( 'o_result', constants.siShaderDataTypeColor3, paramOptions )
 paramDef.MainPort = True

 # Renderer definition
 rendererDef = shaderDef.AddRendererDef( '3Delight' )
 rendererDef.SymbolName = 'lambertian_1_0'
 rendererDef.CodePath = 'c:/tmp/lambertian.sl'

 # Node layout for the PPG
 layout = shaderDef.PPGLayout
 layout.AddGroup( '' )
 layout.AddItem( 'i_ambient_color', 'Ambient' )
 layout.AddItem( 'i_color', 'Color')
 layout.EndGroup( )

 # Node layout for the Render Tree
 layout_render_tree = shaderDef.RenderTreeLayout
 layout_render_tree.AddGroup( '' )
 layout_render_tree.AddItem( 'i_ambient_color', 'Ambient' )
 layout_render_tree.AddItem( 'i_color', 'Color')
 layout_render_tree.EndGroup( )

 return True
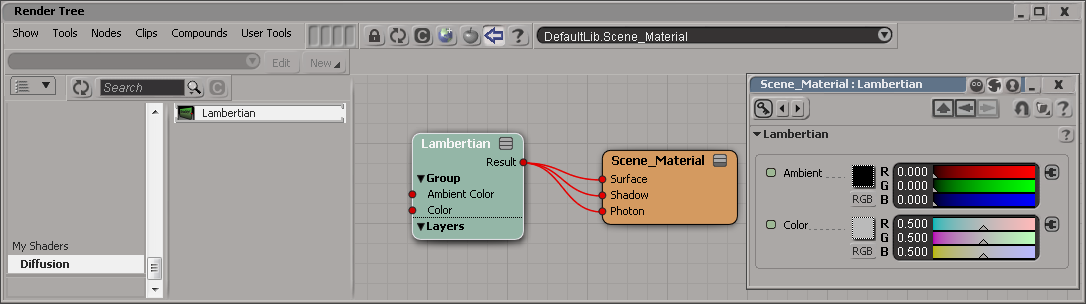
With this done, you are all set for the Softimage part, and now you can have a fully working custom shader node inside Softimage. Note that this shader will only work with 3Delight. The result will look like this:
3Delight for Softimage will search for the function named lambertian_1_0 inside the SL file called lambertian.sl. At this point, if you try to render this, you will receive the following message:
# WARNING : 3Delight: unable to compile shader DefaultLib_Scene_Material
# INFO : C:\tmp\DefaultLib_Scene_Material_surface.sl:82: Cannot open file: c:/tmp/lambertian.sl.
This means 3Delight for Softimage was able to acknowledge this new shader but, unfortunately, it wasn’t able to find the shader itself in order to provide you with the appropriate result – this is normal since we didn't write the shader just yet.
Creating the RenderMan shader
Now that we have provided Softimage with an interface for our shader, we have to write the actual shader code. For more information on the RendeMan Shading Language used by 3Delight, please read the 3Delight User's Manual (chapter called “The Shading Language”). The first think you have to do is to create a file named lambertian.sl using your favorite text editor. This file need to be located inside your c:/tmp folder (we could assign any directory in the python script above).
Add the following lines of code inside your file:
3Delight - Shader code
/*
 color i_ambient_color : Represent the Softimage input ambient color from part one of this tutorial
 color i_color : Represent the Softimage input diffuse color from part one of this tutorial
 output color o_result : Represent the Softimage output result color from part one of this tutorial
*/
void lambertian_1_0(    color i_ambient_color;
                    color i_color;
                    output color o_result)
{
    /* Represent the Surface shading normal of the object */
    extern normal N;
    /* This will return the normalize shading normal of the object */
    normal Nn = normalize( N );

    uniform color ambience = 0.0;
    color amb = 0.0;
    color raw_diff = 0.0;
    color diff = 0.0;


    /* This will provide us the ambient override color inside Softimage */
    option( "user:xsi_ambience", ambience );


    amb = ambience * i_ambient_color;
    raw_diff = diffuse( Nn );
    diff = raw_diff * i_color;

    /*
        This will properly populate the ambient, albedo and diffuse channels
    */
    outputchannel( "Ambient", amb );
    outputchannel( "Albedo", i_color );
    outputchannel( "Raw_Diffuse", raw_diff );
    outputchannel( "Diffuse", diff );

    o_result = amb + diff;
}
When the file is properly located, you just have to press render again and 3Delight will compile and render your scene using your new shader. This will automatically be compatible with the Path Tracing (including IPR) and REYES algorithms. The end result of this shader will provide you with the following result:
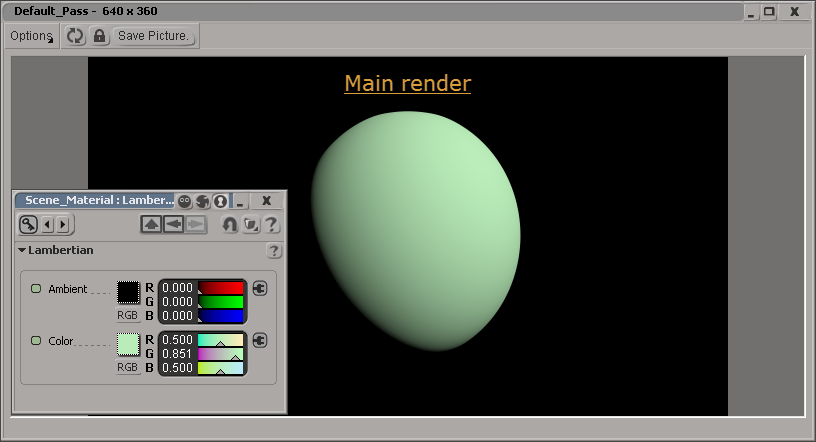
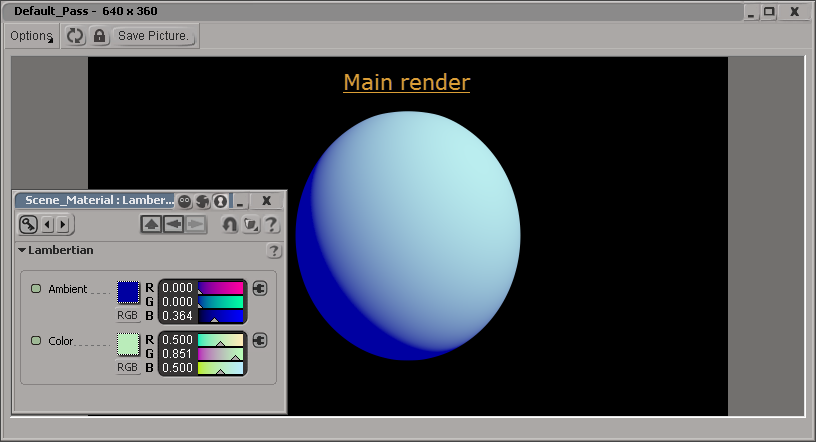
The available render channel of this example are:
- Main (Ambiant + Diffuse)
- Ambient
- Albedo (Color input)
- Raw_Diffuse (Diffuse / Albedo)
- Diffuse (Diffuse x Albedo)
An important advantage of 3Delight for Softimage is it make it easy to troubleshoot and maintain your shader code since you do not have to compile your code against a version of the renderer. 3Delight for Softimage will compile it at run time along with the rest of the Render Tree node in order to provide the appropriate result. This allows easy debugging and optimisation of shaders.
Example Video
This video demonstrates how you can develop the shader we just presented and and debug it live inside Softimage's render view.
Overview
Content Tools