The 3Delight Material is a general purpose, physically plausible, dual-layer material that can be used to render a large variety of surfaces, including the ability to simulate surfaces that have a coating. Coated materials include common real world objects such as furniture, cars, toys and many plastics. The coating layer adds interesting effects on gazing angles and adds an additional specular highlight (from the coating itself) that can be observed on most coated materials (it is especially noticeable on car paint and many legacy shaders simulate this effect by having a secondary highlight control, which is not physically plausible). Bump mapping can be applied to either/or the coating and the base layer. Additionally, it can be used in conjunction with displacement.
Coating | ||||||||||
On | Specifies wether or not there is a coating on top of the Base layer. Visually, the presence of coating adds the following two phenomenas to the look of the layer:
| |||||||||
Color | The color of the coating. Light that travels through the coating will be coloured according to transmittance. The following images have been rendering with a white Colour so that it can be compared to the images in the Color section.
| |||||||||
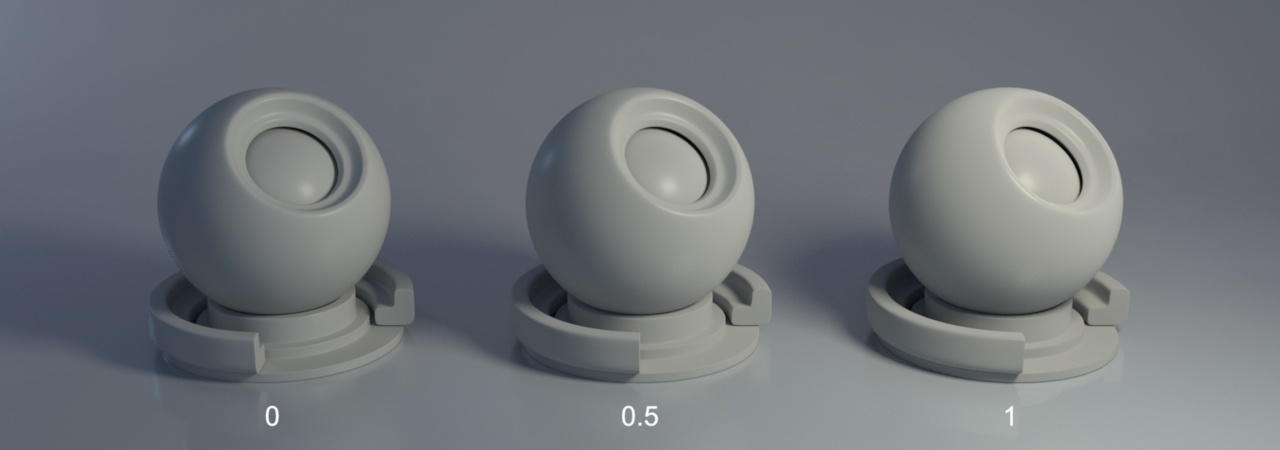
Reflectivity | Specifies the degree of reflectivity through a normalised range. The more there is reflectivity on the coating, the less light goes to the base layer. In the following progression, a blue coating layer is more and more present with higher reflectivity.
| |||||||||
Roughness | This controls the specular roughness of the coating material. The smaller the value, the smoother is the surface of the coating.
| |||||||||
Thickness | Thickness of the coating in scene units (world units). For example, when rendering a coated table of 1 meter, a value of 0.001 means a thickness of 1 millimeter. In the image below, note how the thickness of the coating makes the highlights of the base surface less and less visible. With a very thick coating, as in the rightmost image, the rough highlight of the base layer is not visible anymore ans is replaced by the highlight of the shinier coating.
| |||||||||
Base Layer | ||||||||||
|---|---|---|---|---|---|---|---|---|---|---|
Diffuse & Subsurace | ||||||||||
Color | Specifies the diffuse color of the base material. | |||||||||
Roughness | This controls how diffuse is the material. A value closer to one simulate very rough materials such as chalk. A value of 0 renders a standard "lambertian" diffuse. On a more technical note, this parameter controls the roughness of the Oren-Nayer diffuse model.
| |||||||||
Color | The color of the transparency. This is the actual opacity and is unrelated to refractions. | |||||||||
Reflection | ||||||||||
Color | Specifies the color of the specular highlight. | |||||||||
Reflectivity | Specifies the degree of reflectivity through a normalised range. This indirectly controls the index of refraction and fresnel that will be used for reflection.
| |||||||||
Roughness | This controls the specular roughness of the base layer. The smaller the value, the smoother is the surface.
| |||||||||
Anisotropy | Specifies anisotropy "directionality". 0 means no anisotropy. Positive values will increase anisotropy along the anisotropy direction and negative value will increase it along the perpendicular direction. | |||||||||
Anisotropy Direction | Specifies the anisotropy direction in local tangents space. | |||||||||
Incandescence | ||||||||||
Color | Specifies the incandescence color. | |||||||||
Intensity | Specifies the incandescence intensity.
| |||||||||
Lights Other Objects | Indicates whether the incandescence should make the object behave like a light source (and affect other objects) or rather simply emit light directly into the camera, without any effect on the scene. Turning this off might improve performance on large objects. | |||||||||
Subsurface | ||||||||||
On | Specifies whether or not the material has subsurface light penetration. | |||||||||
Transmittance | Visually, this specifies the color of the light that is diffused nearby the entry point of a light beam. For skin, this would be reddish. | |||||||||
Model Scale | A global scale that applies to this material. Larger scales will make the object appear more translucent. This is the best way to control how much diffusion goes into the surface. A scale closer to 0 will tend to disable the subsurface scattering effect and the surface will look solid.
| |||||||||
Object Space | Interprets the Model Scale parameter in object space. This makes the look of the object independent from the transforms that might be applied to it in the scene. | |||||||||
IOR | The index of refraction of the based layer. | |||||||||
Merge Set | When two or more subsurface volumes overlap, their internal boundaries can create darker (or brighter) areas on the surface. Setting their Merge Set to an identical name disables those boundaries and their effect on the surface, effectively merging the volumes together. | |||||||||
Dominant Material | When two or more subsurface volumes overlap, a mix of their properties will normally be used inside their intersection. Checking this option for one of the materials will prevent this mixing and ensure it's used exclusively. | |||||||||
Double-Sided | Allows the SSS simulation to be entered and exited from the front or the back of a surface. When this option is disabled (the default), the simulation is entered only from the front and exited only from the back. | |||||||||
Bump | ||||||||||
Layer Selection | Allows you to choose whether to apply bump to the coating, base layer or both layers (default).
The following zoom show the interesting different in looks obtained by the
| |||||||||
Bump Mapping(Maya only) | A slot to connect a Maya bump2d or bump3d node, simply click on the texture button to connect a texturing node, the bump node will be created automatically and recognize wether of 2d or 3d type. | |||||||||