...
| Info |
|---|
For a proper IBL workflow, three aspects are key to achieve eye-pleasing imagery:
|
Unlike other renderers (that generally fail at sampling IBL environments efficiently), 3Delight provides a proprietary, state of the art, environment sampling algorithm which does not require users to rely on caveats like:
- using multiple versions of the HDRI for different ray types;
- downsizing the HDRI;
- blurring the HDRI;
- manually controlling the multiple importance sampling of the HDRI, e.g. by setting a "sampling resolution" number.
...
- An image captured on set by taking multiple photographic exposures and post-processed them into a single image.
- A procedural sky texture (the Hosek & Wiklie model, used in the 3Delight Sky, provides superior quality than the Preetham model).
- A manually crafted image, wether hand painted in an application that supports floating point data (e.g. Nuke) or created with ad-hoc authoring tools (such as "HDRI HDR Light Studio").
- A pre-rendered HDR image in lat-long format: you can use the "spherical camera projection" to render a HDR rendering of your 3D set and then re-use it as environment in situation where the full 3D set is not required.
What mapping should I use?
- latitude/longitude
- spherical image
Step-by-step guide for Exteriors Lightingimage-based lighting
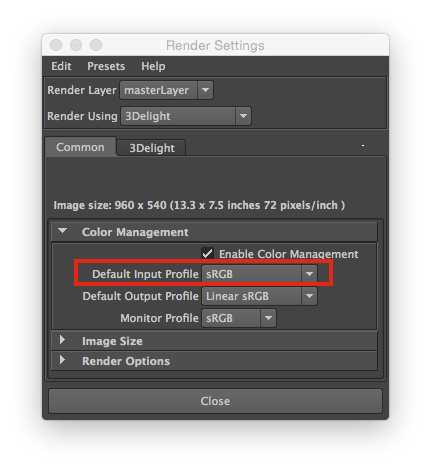
First you should turn on "color management" in the common section of the Maya Render Globals:
...
- Create an Environment node and map a HDRI image. You can choose to use:
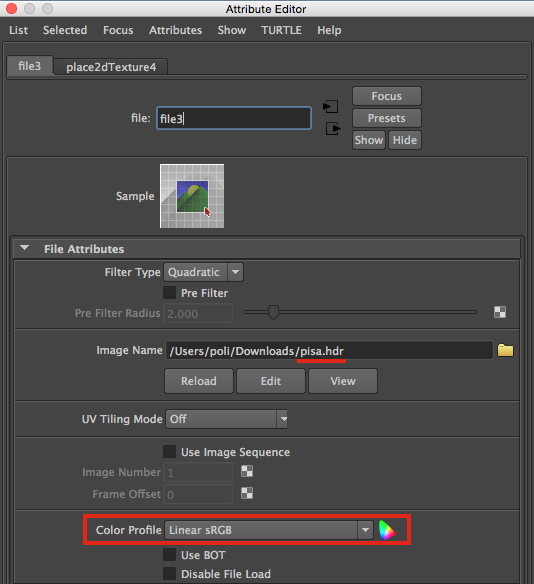
- via a Maya File node. In such case, make sure to carefully understand input file textures Color Management first (most likely you will need to set the color profile for your Maya File node holding the HDRI image as "linear"):
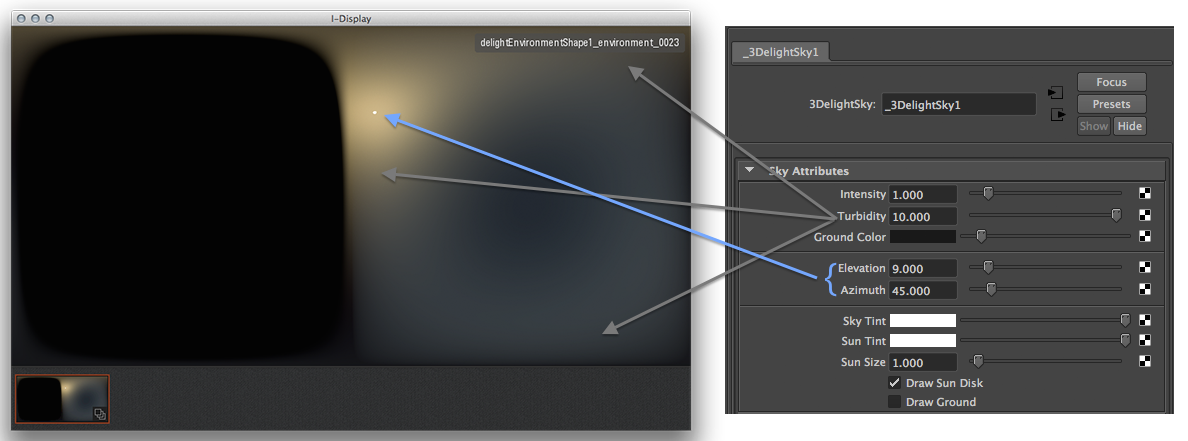
- or, if you want to use a procedural physical sky model, use the 3Delight Sky node (which is always linear).
or any other 2D texture/procedural node such as ramp etc.
Info If you are using the 3Delight OSL renderer you can optionally use a solid color (therefore having no 2dtexture connected)
- via a Maya File node. In such case, make sure to carefully understand input file textures Color Management first (most likely you will need to set the color profile for your Maya File node holding the HDRI image as "linear"):
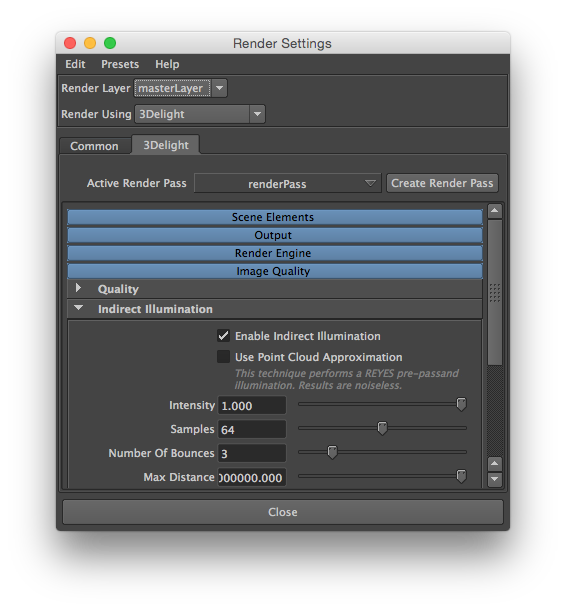
Enable Indirect Illumination and choose an appropriate number of indirect bounces (the default value of 2 is a good start for exteriors)
Info 3Delight features highly optimized multi-bounce path tracing global illumination with tiny performance impact on larger number of indirect illumination bounces. Values up to 16 bounces are possible and can be beneficial in complex interior setups (see relative section below).
- Render in i-Display (make sure to use the right image viewer color profile in i-Display, most likely you will need "Linear to sRGB").
Now you can render:
...
- Make sure the 3Delight for Maya plugin is loaded for your version of Maya.
- Create a new scene and select 3Delight as a main renderer in render globals.
- Create/import some geometries — for this scene you can use the beautiful and free "Ajax 3D OBJ scan model" from Jotero.
- Apply the general purpose 3Delight Material, a “physically/visually plausible” material which uses the Cook-Torrance BSDF.
- In the Preference choose to render in the Maya Render View or in i-Display (where you can see all the image layers (AOVs) in one go).
- Enable Color Management, to achieve a proper linear workflow, in the Render Globals > Common section.
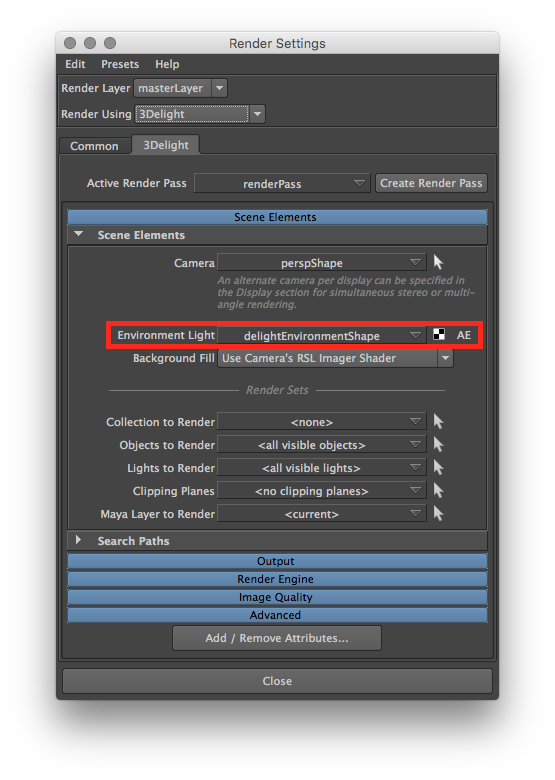
- In Render Globals > 3Delight's defaul render pass: create a delightEnvironment node.
- Apply an HDRI texture.
Download an HDRI image, for example you can use the "pisa.hdr" texture from Paul Debevec's High Res Probes:
Info Because you have enabled Color Management and because by default the setting in the Render Settings assume you will be inputting to the renderer sRGB images (which is the default too as we implicitly assume the majority of input texture come from non-linear authoring tools, such as Photoshop, and are not pre-linearized) you must remember to override the color profile for the Maya File texture node where you will plug, in this example, the pisa.hdr environment.
If, on the other hand, all your input textures are pre-linearised, then you can switch to linear input color profile in the Render Settings and leave the default inherit behaviour for the Maya File texture node.

- or you can use a procedural texture such as the 3Delight Sky:
- or create and use a "hand made" HDRI texture:
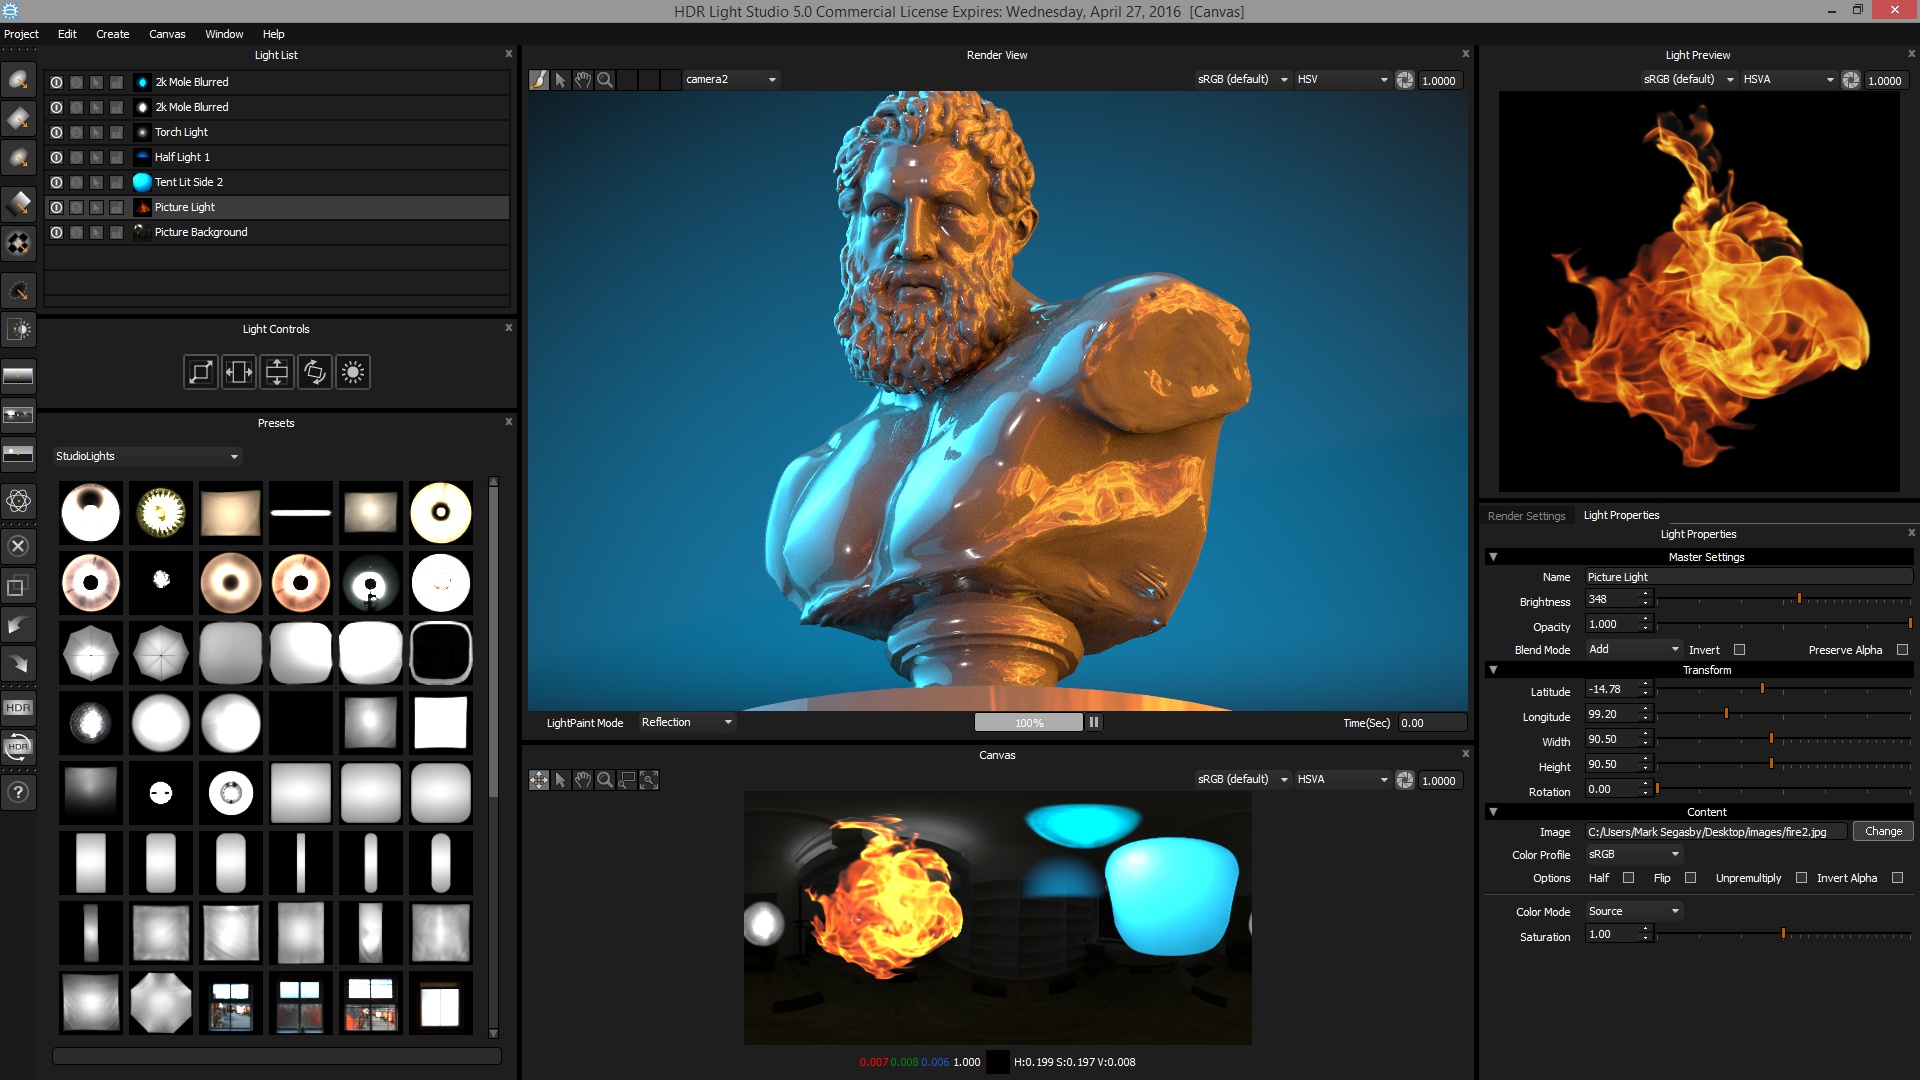
In Nuke you can experiment by roto-painting areas with high dynamic range HSV values, in the following screenshot HSV's V value is set to 4. The size, softness or hardness of the strokes will produce different results in the illumination from the environment. The image should be written out as a 16/32bit EXR or 32 bit HDR.
Aside Nuke there are other tools, such as HDRI HDR Light Studio, where you can procedurally author HDRI images or edit existing ones to add new image-based or procedural lights.


- Render – you will get mostly a black image except, if using the 3Delight Material, you should see some reflectivity stored in the corresponding image layer since the default settings of the 3Delight Material have 10% of reflectivity at grazing angles. This step should make clear to you that the environment is visible to reflections and refractions. In order to receive indirect illumination from the environment you will now need indirect illumination.
...
| Info |
|---|
Here are key aspects of the IBL workflow in 3Delight: → The illumination and shadowing reacts from the details in the HDRI. |
...
Notes for Interiors Lighting (To Be Completed)
For interior rendering there are two cases:
- Interiors Fully enclosed interiors, without any openings towards the exterior (e.g. a fully enclosed room with no openings, such as windows and doors, allowing external light to come in).
- Interiors with openings towards the exterior (e.g. a room with windows, doors, or oher other type of openings).
...
Fully enclosed interiors
- Create (geo) Area ) Lights, matching size and position, for each important light sources that illuminates the scene (typically large area lights, neons etc.)
- Make sure all Lights have inverse square falloff (required by physics for plausible lighting)
- Assign to less important emissive objects (such as neons) a fully incandescent shader with incandescence value near or equal to 1 (this will change in the future and overbought intensity won't cause additional noise).a material with incandescence (make sure to not push the color values above 1 because of color management, instead use the incandescence intensity).
- Turn on Indirect Illumination
- Set Indirect Illumination Diffuse Bounces to 3 or more (increase by 1 unit as the effect might become neglectable after many bounces, looking at statistics will help).
Or:
- It is also possible to create OPTIONAL: Create an HDRI environment with a texture that loosely matching the interior you are rendering. If you have a texture acquired on set for VFX this is the best case scenario.
- Turn on Indirect Illumination
- Set Indirect Illumination Diffuse Bounces to 3 or more (increase by 1 unit as the effect might become neglectable after many bounces)If the set is full 3D you can render a spherical projection version of your environment.
- Set the Indirect Illumination> Max Distance to force environment rays to be called inside the interior: e.g if your room would fit in a sphere of radius 50 units, set the max distance to 25 (or less) units.
| Info |
|---|
Note that 3Delight has no problem using a higher number of diffuse bounces. Typically It not unlikely for fully enclosed interiors will require around 4 to 6 bounces. |
...
to require higher numbers of diffuse bounces (check statistics for precise feedback) |
Interiors with openings
- Setup Environmentthe HDRI environment with a texture representing the exterior lighting
- Set Push indirect diffuse bounces to higher values, up to 16 bounces are possible, with tiny impact on performance.
Optionally:
- Position Area Lights behind light entry areas (typically windows) and setup an HDRI environment
OR
- 3 or more (check statistics for feedback)
- Positioning Area Lights behind openings (typically doors / windows) towards the exterior will help "pushing light" inside the roomPosition Area Lights behind light entry areas (typically windows), but this time declare them as "portals" to focus an outside HDRI environment you have setup