...
- latitude/longitude
- spherical image
Step-by-step guide for Exteriors Lightingimage-based lighting
First you should turn on "color management" in the common section of the Maya Render Globals:
...
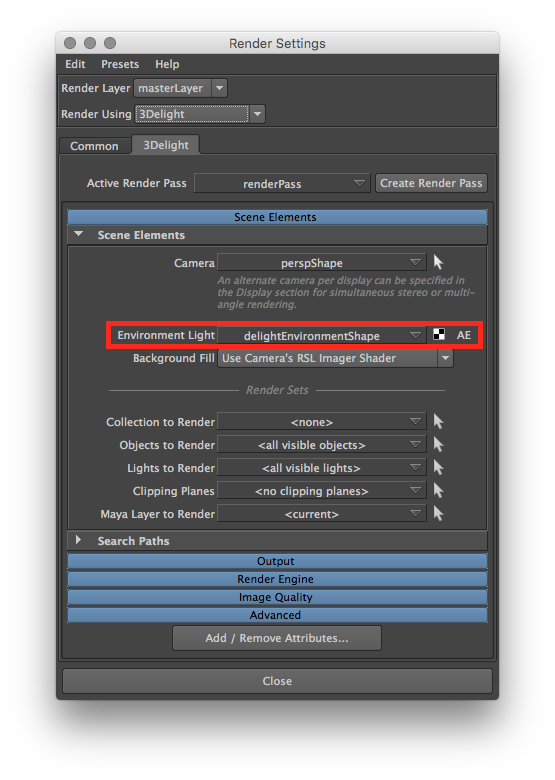
- Create an Environment node and map a HDRI image. You can choose to use:
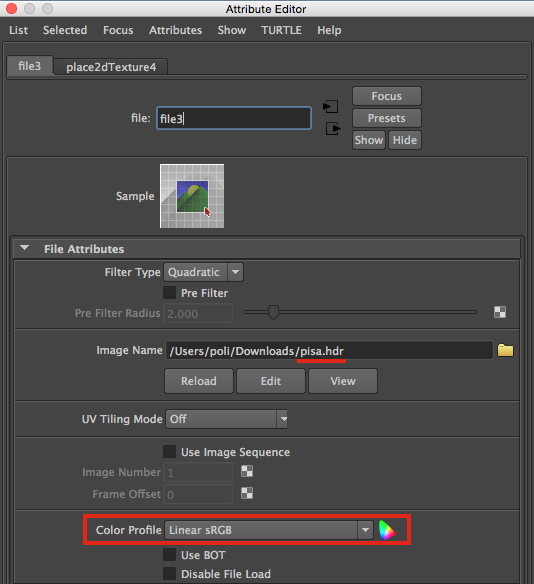
- via a Maya File node. In such case, make sure to carefully understand input file textures Color Management first (most likely you will need to set the color profile for your Maya File node holding the HDRI image as "linear"):
- or, if you want to use a procedural physical sky model, use the 3Delight Sky node (which is always linear).
or any other 2D texture/procedural node such as ramp etc.
Info If you are using the 3Delight OSL renderer you can optionally use a solid color (therefore having no 2dtexture connected)
- via a Maya File node. In such case, make sure to carefully understand input file textures Color Management first (most likely you will need to set the color profile for your Maya File node holding the HDRI image as "linear"):
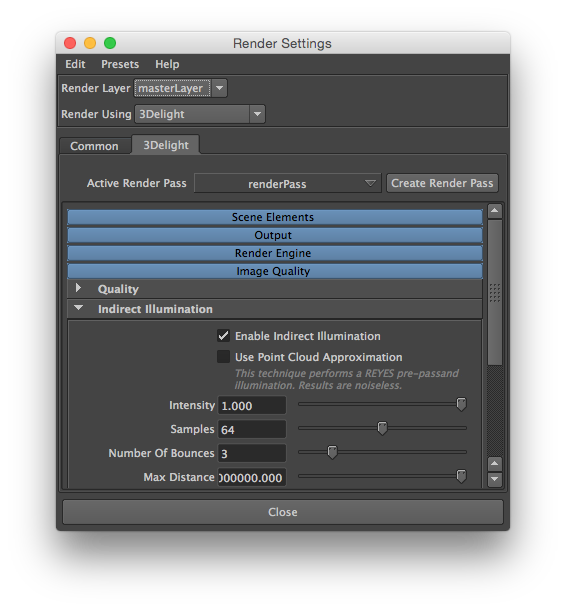
Enable Indirect Illumination and choose an appropriate number of indirect bounces (the default value of 2 is a good start for exteriors)
Info 3Delight features highly optimized multi-bounce path tracing global illumination with tiny performance impact on larger number of indirect illumination bounces. Values up to 16 bounces are possible and can be beneficial in complex interior setups (see relative section below).
- Render in i-Display (make sure to use the right image viewer color profile in i-Display, most likely you will need "Linear to sRGB").
Now you can render:
...
| Info |
|---|
Here are key aspects of the IBL workflow in 3Delight: → The illumination and shadowing reacts from the details in the HDRI. |
...
Notes for Interiors Lighting (To Be Completed)
For interior rendering there are two cases:
- Fully enclosed interiors, without any openings towards the exterior allowing external light to come in.
- Interiors with openings towards the exterior (e.g. a room with windows, doors, or other type of openings).
Fully enclosed interiors
- Create (geo) Area Lights, matching size and position, for each important light sources that illuminates the scene (typically large area lights, neons etc.)
- Make sure all Lights have inverse square falloff (required by physics for plausible lighting)
- Assign to less important emissive objects a material with incandescence (make sure to not push the color values above 1 because of color management, instead use the incandescence intensity).
- Turn on Indirect Illumination
- Set Indirect Illumination Diffuse Bounces to 3 or more (increase by 1 unit as the effect might become neglectable after many bounces, looking at statistics will help).
...
| Info |
|---|
Note that 3Delight has no problem using a higher number of diffuse bounces. It not unlikely for fully enclosed interiors to require higher numbers of diffuse bounces (check statistics for precise feedback) |
...
Interiors with openings
- Setup the HDRI environment with a texture representing the exterior lighting
- Set indirect diffuse bounces to 3 or more (check statistics for feedback)
- Positioning Area Lights behind openings (typically doors / windows) towards the exterior will help "pushing light" inside the room