3Delight renderings can be launched and stopped through the 3Delight Shelf, the 3Delight menu, or in the Render Settings themselves. Starting a rendering with a specific Render Settings will always set it as active in the Houdini Render Settings window. Starting a rendering without specifying which Render Settings to use will use the one set as active in the Houdini Render Settings window.

The 3Delight Shelf buttons to control renderings.

The Render Settings with the "Render" buttons
The 3Delight menu items to control renderings.
Selecting the Resources for Rendering
By default, rendering is processed using the CPU on your computer. Yet, you have two other options for potentially much faster rendering: using 3Delight Cloud or using 3Delight Collective (which is a set of computers from your network). The selection of the ressource to use (and how much of it) is done in the Processing panel of 3Delight Display.
Rendering a Single or Sequence of Images
Rendering usually produces images in 3Delight Display or the Houdini Render View (depending on the ROP used), and optionally save the images on file. Rendering a frame sequence is possible; 3Delight Display will show every rendered frame.
Such rendering can be launched by doing one of the following:
- Clicking the
 button in the 3Delight Shelf.
 - Clicking the Render button in the Render Settings.
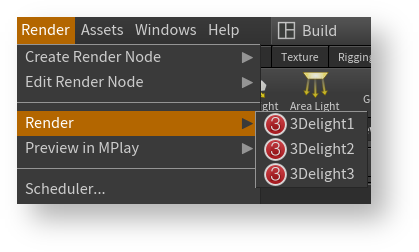
- Choosing the Render → Render → 3Delight menu item.
If the scene contains several Render Settings, you can choose which one will be used by selecting the ROP node you want on Network View and then click on ![]() shelf command or Render button of that node. Another way is by using the Render → Render and then choose which Render Settings will be used as in the images above.
shelf command or Render button of that node. Another way is by using the Render → Render and then choose which Render Settings will be used as in the images above.
The Image Layers section of the Render Settings allows you to configure what image layers are shown in 3Delight Display, and which ones are saved in files.
Starting a Live Rendering (IPR)
A live rendering continuously monitors the Houdini scene and automatically (and progressively) updates the image to reflect the changes. The image of the current frame is shown in 3Delight Display or the Houdini Viewport, without motion blur. No image files are output during a live rendering. You can choose whether you want to render interactively on iDisplay using 3Delight ROP or on Houdini viewport using 3Delight Viewport ROP.
A live rendering can be started by doing one of the following:
- Clicking the Start IPR button in the 3Delight ROP.
- Clicking Render button in the 3Delight Viewport ROP.
Starting a Batch Rendering
A batch rendering only produces image files. To start a batch rendering, we can select Image File option from Output tab to only produce image files when rendering.
The Image Layers section of the Render Settings allows you to configure which image layers are saved in files.
Aborting an Ongoing Rendering
You can abort an ongoing rendering by doing one of the following
- Clicking the Abort Render button in the Render Settings being rendered.
Rendering in a Houdini Viewport
To render in a Houdini Viewport, first you have to create a 3Delight Viewport ROP node and then click Render button.
Rendering using Command Line
Rendering Houdini files (.hipnc)
Rendering Houdini files can be done using Houdini's Render command line executable. Renderings launched this way are batch renderings. The Houdini file will first be read in memory by Houdini, then 3Delight will translate and render it. For more details about the command line options, see Batch Rendering.
Rendering NSI files (.nsi)
Rendering NSI files can be done using 3Delight's renderdl command line executable. Rendering launched this way require pre-generation of the NSI file(s). Such NSI file(s) can then be rendered directly. While generating an NSI file is an additional step, once done, rendering is more streamline in terms of resources requirement as it does not involve Houdini Batch and its related memory allocations. For more details about the command line options, see Batch Rendering.