| Section | |||||||||||||||
|---|---|---|---|---|---|---|---|---|---|---|---|---|---|---|---|
|
Enabling Color Management
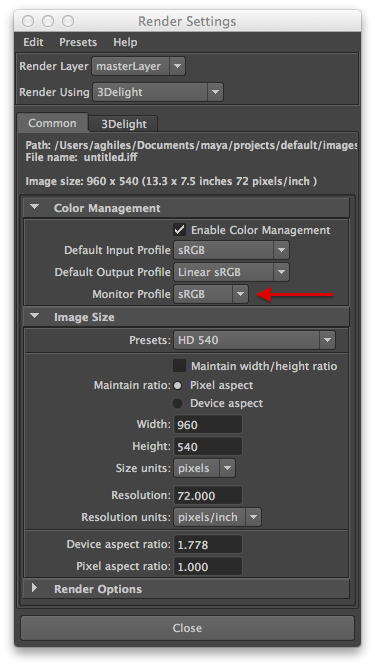
To enable color management, simply enable Color Management in the Common tab of the Render Settings. The standard Maya settings are supported:
Default Input Profile
Specification of the input color space for textures.
Default Output Profile
Specification of the output color space for images.
In addition to these two parameters, 3Delight for Maya lets you specify another very important color space:
Monitor Profile
Specifies the color space of the monitor on which lighting or surfacing work is performed. Having the correct profile of your monitor is a useful (even necessary) additional control. In fact, by knowing the color profile of your monitor 3Delight for Maya can automatically apply the necessary corrections to the color swatches of Attribute Editor.
Monitor Profile attribute is added when 3Delight is selected as the render engine.
| Info |
|---|
Note that it is not possible to use the Default Input Profile as the monitor color profile because that attribute is used for textures. Textures are usually created in sRGB space but some monitors are calibrated for REC.709. Lighters working on such monitors can just switch the Monitor Profile to REC.709 and everything is set automatically. |
Color Management in the File Node
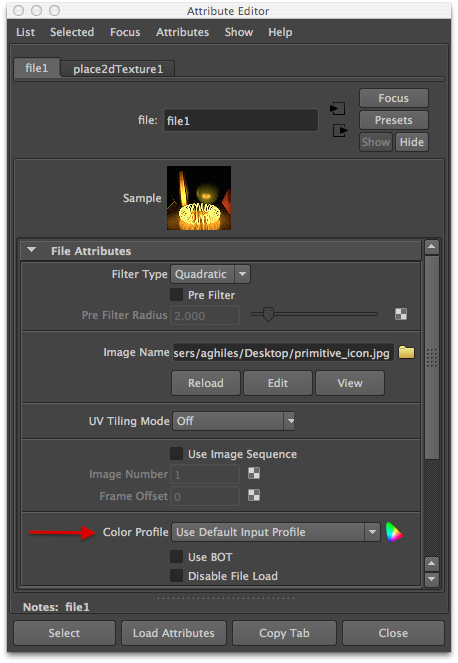
Most texture files are created in software such as Photoshop. This means that the most probable color space for these textures is sRGB. The most convenient way of setting the color space for textures is to set the global Default Input Profile to sRGB and to set the Color Profile attribute of the File node to "Use Default Input Profile".
Color Profile selection in the File Node
Color Management in the Viewport
In Maya 2015 it is possible to have a better color balance in the viewport by setting the Gamma of the Viewport 2.0 to 2.2.
| Info |
|---|
Setting the gamma to 2.2 is a poor approximation to an sRGB profile. That is why it is incorrect to say that Maya has color management in the viewport. None the less, it is better to use a gamma of 2.2 rather than using a linear profile (with no gamma correction). |
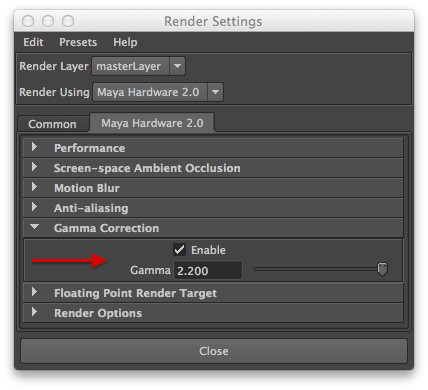
To set the gamma, select Viewport 2.0 and enable gamma correction in the Hardware Renderer 2.0 Settings, as show below.
Enable Viewport 2.0
Enable gamma correction and set Gamma to 2.2
Color Management in the Attribute Editor
To be continued...


