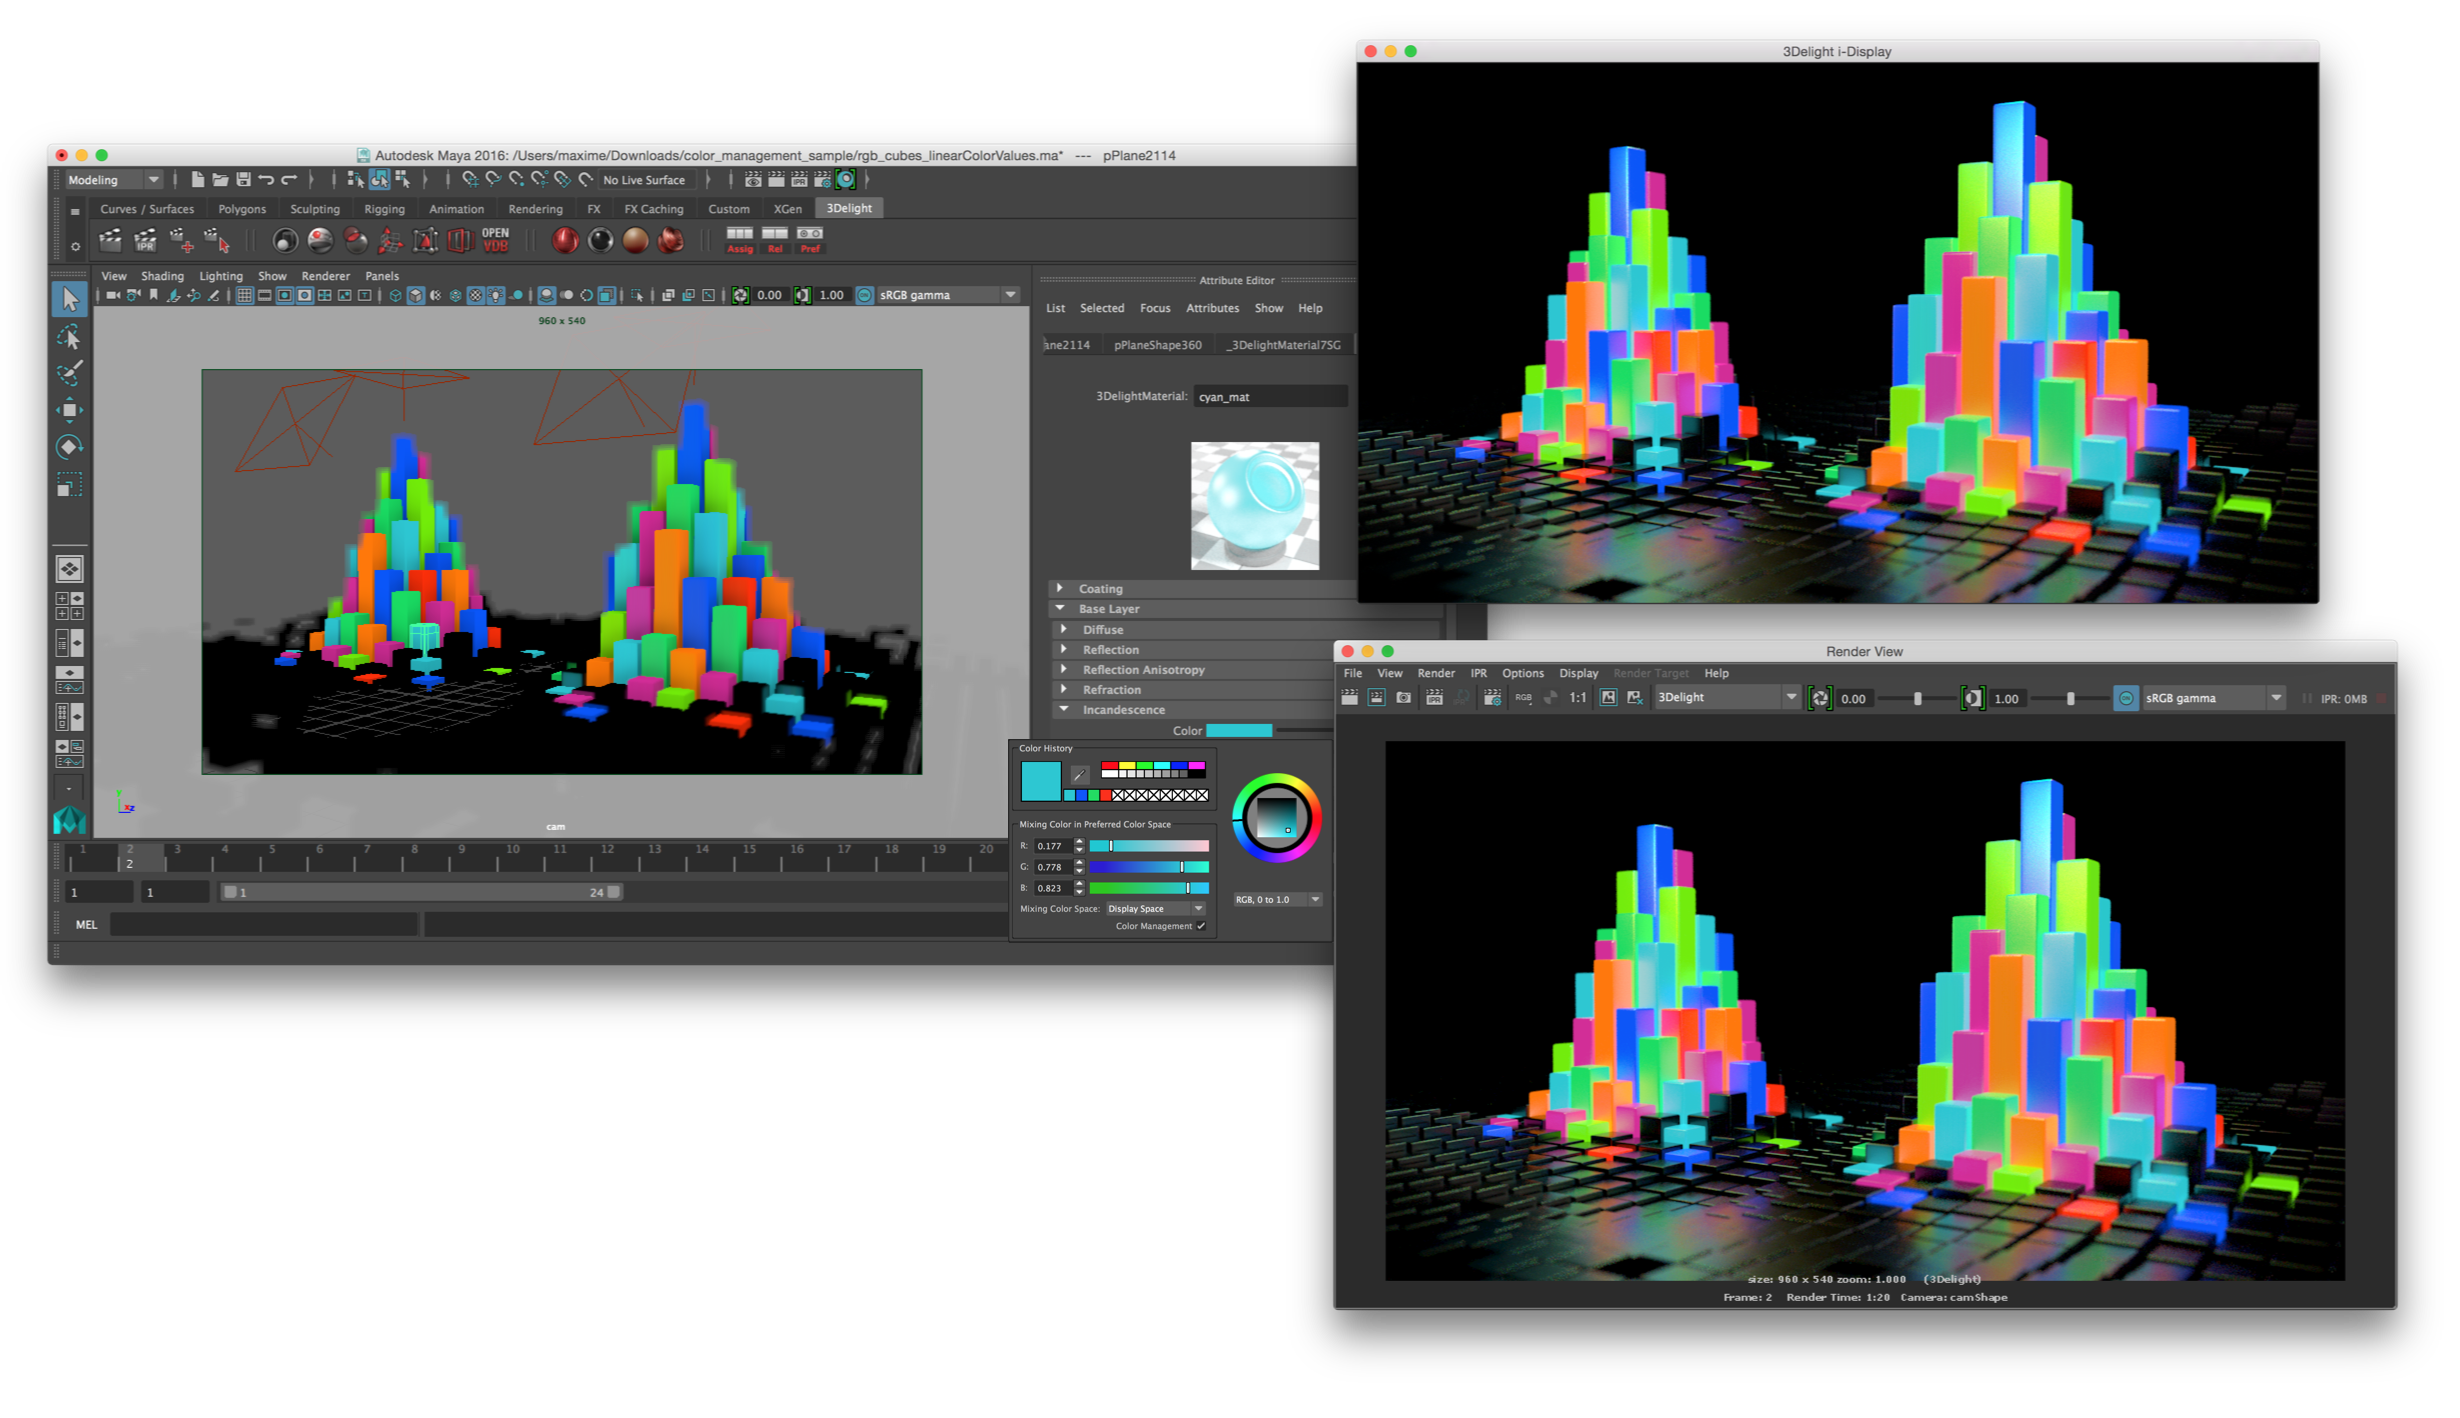
In this test scene, the colors on the left object are picked using Maya's color swatch and the right colours are projected using a texture. Thanks to color management, the colors match perfectly even though they came from different sources. Furthermore, they look identical in the Viewport, Attribute Editor, Color Chooser, Render View and i-DisplayYou can download the example scene here.


Content


Overview

Maya 2015 Extension and newer versions introduce improved colour management options. The important changes are:

  • Colour-managed Color Chooser;
  • Refined gamma options in the Scene Viewport;
  • Refined gamma options in the Render View;
  • Colour-managed color attribute gadget in the Attribute Editor.

Differences with the 3Delight for Maya colour management

In Maya 2015 and older, once the colour management is enabled, 3Delight for Maya will automatically adjust the gamma of shader colour attributes, discerning what should be managed and what should not (see this page for details). This works on the assumption that the actual colour attribute value is set to a colour in a non-linear space.

The colour management options in Maya 2015 Extension and up assume that the shader colour attribute values are in a linear space. This allows a proper rendition of the colour everywhere else.


Highlights of the 3Delight for Maya colour management

Benefits:

  • Scenes shaded in older Maya versions continue to render correctly in Maya 2015 Extension and later;
  • The system automatically recognizes what is supposed to be color corrected and what is not. For example, 3Delight for Maya automatically uses linear color space for "non-color" data such as displacement shaders.

Drawbacks:

  • The Scene Viewport will show either incorrect gamma (when Raw is selected as the gamma curve) or incorrect colours (when any non-linear gamma option, such a sRGB Gamma, is chosen).
Highlights of the Maya colour management

Benefits:

  • Consistent colour rendering across the Color ChooserScene ViewportRender View and the Attribute Editor Color gadgets.

Drawbacks:

  • May require that the user makes sure that the Color Chooser has proper color management options set, especially before and after editing a colour on a node that should not be color managed, such as a node used by a displacement shader. Click "Show the Maya Colour Management configuration steps..." below, then click here for details.
  • Cannot be applied on scenes shaded in older Maya versions.

The two approaches are mutually exclusive. A scene shaded with color management options enabled in Maya 2015 Extension will contain shader colour values in linear space, which is incompatible with the 3Delight for Maya color management workflow. For this reason, it has been disabled by default in Maya 2015 Extension and later.

To configure 3Delight for Maya colour management, head over here and ignore the remainder of this page.


Maya Preferences Settings

Portions of the Maya Color Management Preferences, with some important settings framed.

  • In the Maya Preferences, pick the Color Management section.
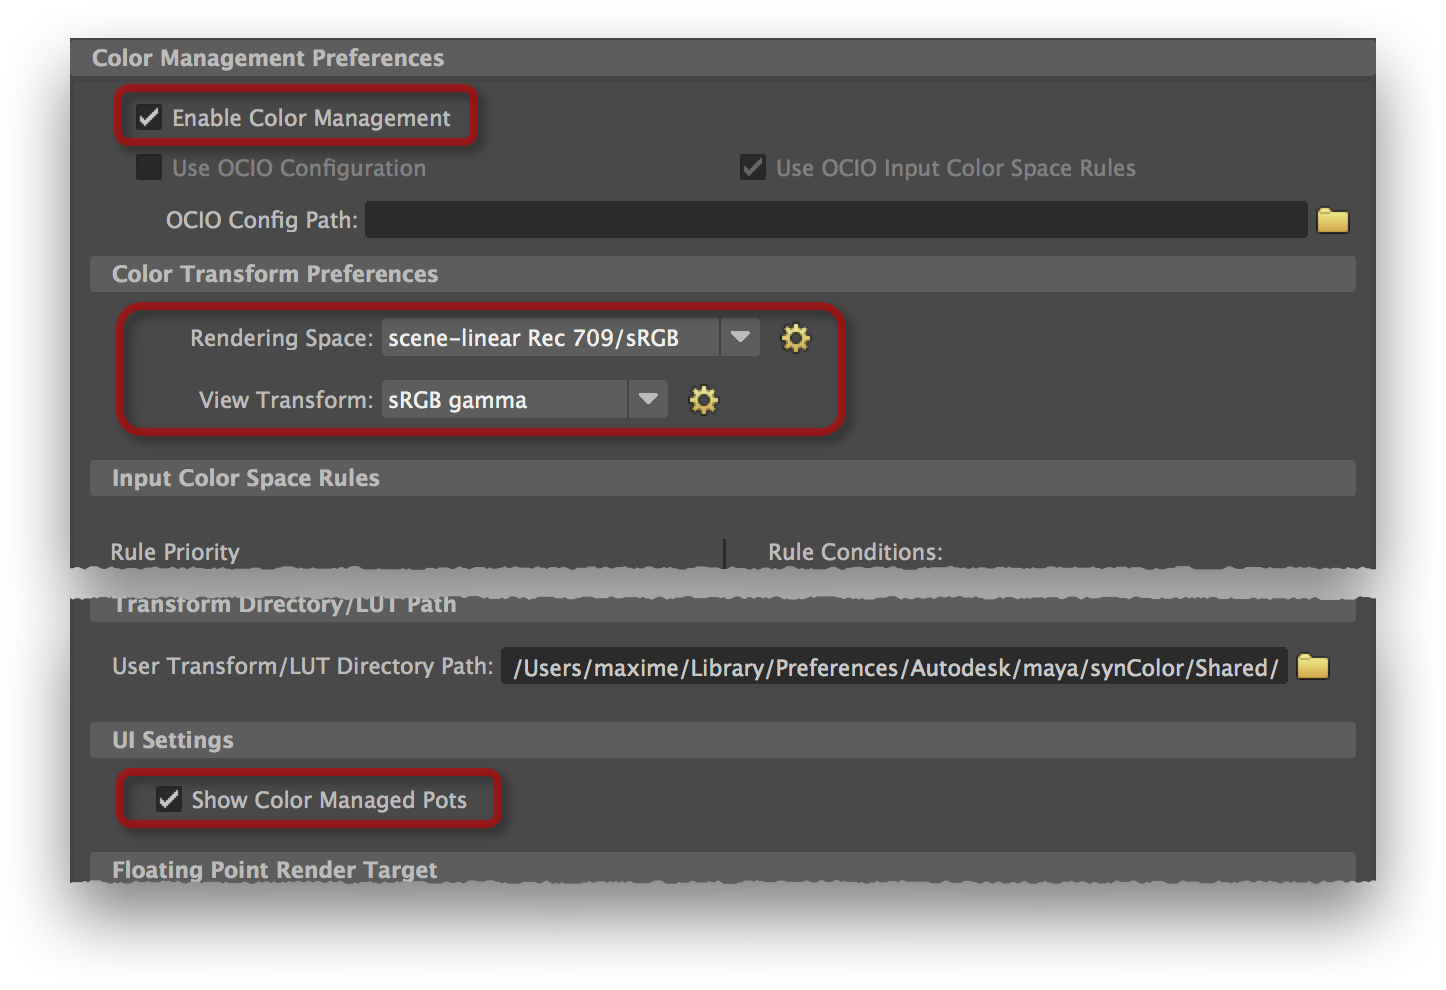
  • In the Color Management Preferences section, turn on Enable Color Management
  • In the Color Transform Preferences, check that:
    • Rendering Space is set to scene-linear Rec 709/sRGB. This is the default. 

      Rendering Space specifies the luminance curve that should be applied to rendered images. scene-linear Rec 709/sRGB is a color space with a linear luminance (gamma) curve. Images are generally rendered with a linear gamma. The final gamma correction is applied at the end of the processing pipeline, by a compositing software, after other effects are processed.
    • View Transform is set to sRGB gamma. This is the default. 

      View Transform specifies the luminance curve of the monitor you are using to display Maya. It can affect how colors are displayed in the Color ChooserAttribute EditorViewport and the Render View. This should be set to the gamma curve your monitor is calibrated to. sRGB gamma and 2.2 gamma are the most commonly used options.
  • In the UI Settings section, turn on Show Color Managed Pots

    This option controls if the colour attribute gadget in the Attribute Editor are shown with a colour-corrected color. It has no effect on the color Chooser. Turning it on is optional, but recommended.
Color Management preferences are saved in the scene, except Show Color Managed Pots and the Input Color Space Rules, which are per-user preferences that remains valid for all scenes.

3Delight Render Settings

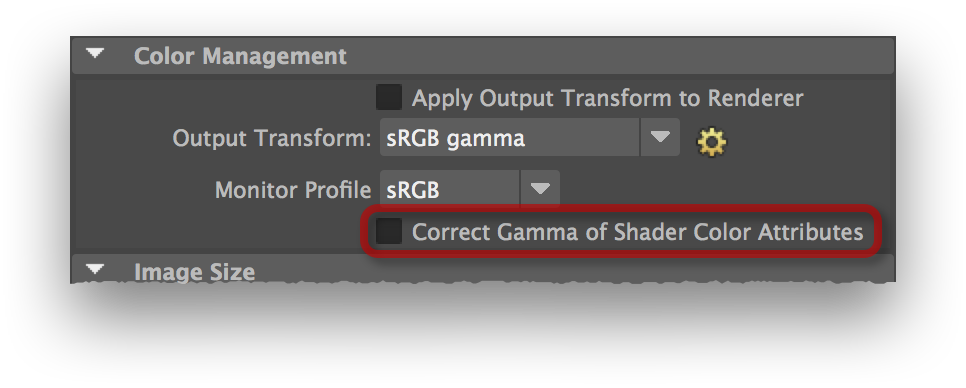
Portion of the Common tab, in the Render Settings window.

  • Open the Render Settings window;
  • Make sure that Render Using is set to 3Delight;
  • In the Common tab, Color Management section, make sure that Correct Gamma of Shader Color Attributes is disabled (this is the default value).

    When this setting is off, 3Delight for Maya assumes that the shader colour attribute values are in a linear color space and will use them directly. This is the case when using the Color Chooser with its Enable Color Management feature turned on.

    This setting must be left disabled if some shader colours were set using the Color Chooser while its Enable Color Management feature was turned on. See above for details.

Colour Chooser Settings

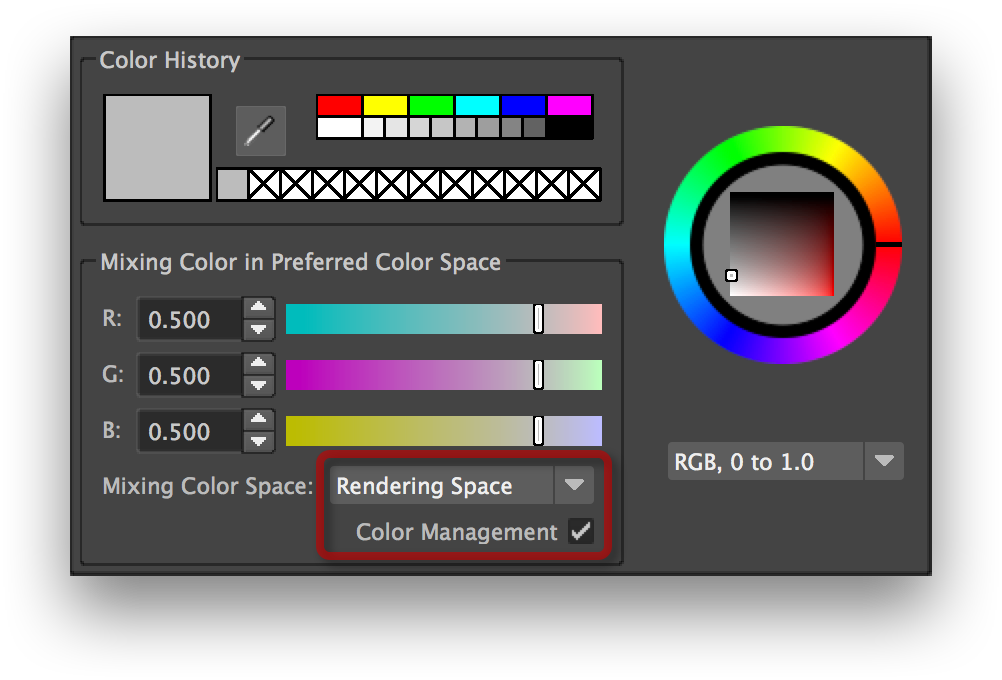
The compact version of the Color Chooser, as it appears when clicking on a color gadget in the Attribute Editor.

  • Bring up the Color Chooser. For instance:
    • Select the default Lambert shader; 
    • In the Attribute Editor, click on the color rectangle of the Color attribute. A double-click will display the full version of the Color Chooser.
  • Make sure that Color Management is enabled;
  • By default, Mixing Color Space is set to Rendering Space. This is a good default value but has some drawbacks; the possible options are detailed below.
The Color Chooser's Mixing Color Space setting and Color Management setting are effective for the whole scene. They are reset to their default values when creating a new scene or opening one.

Choosing a Mixing Color Space


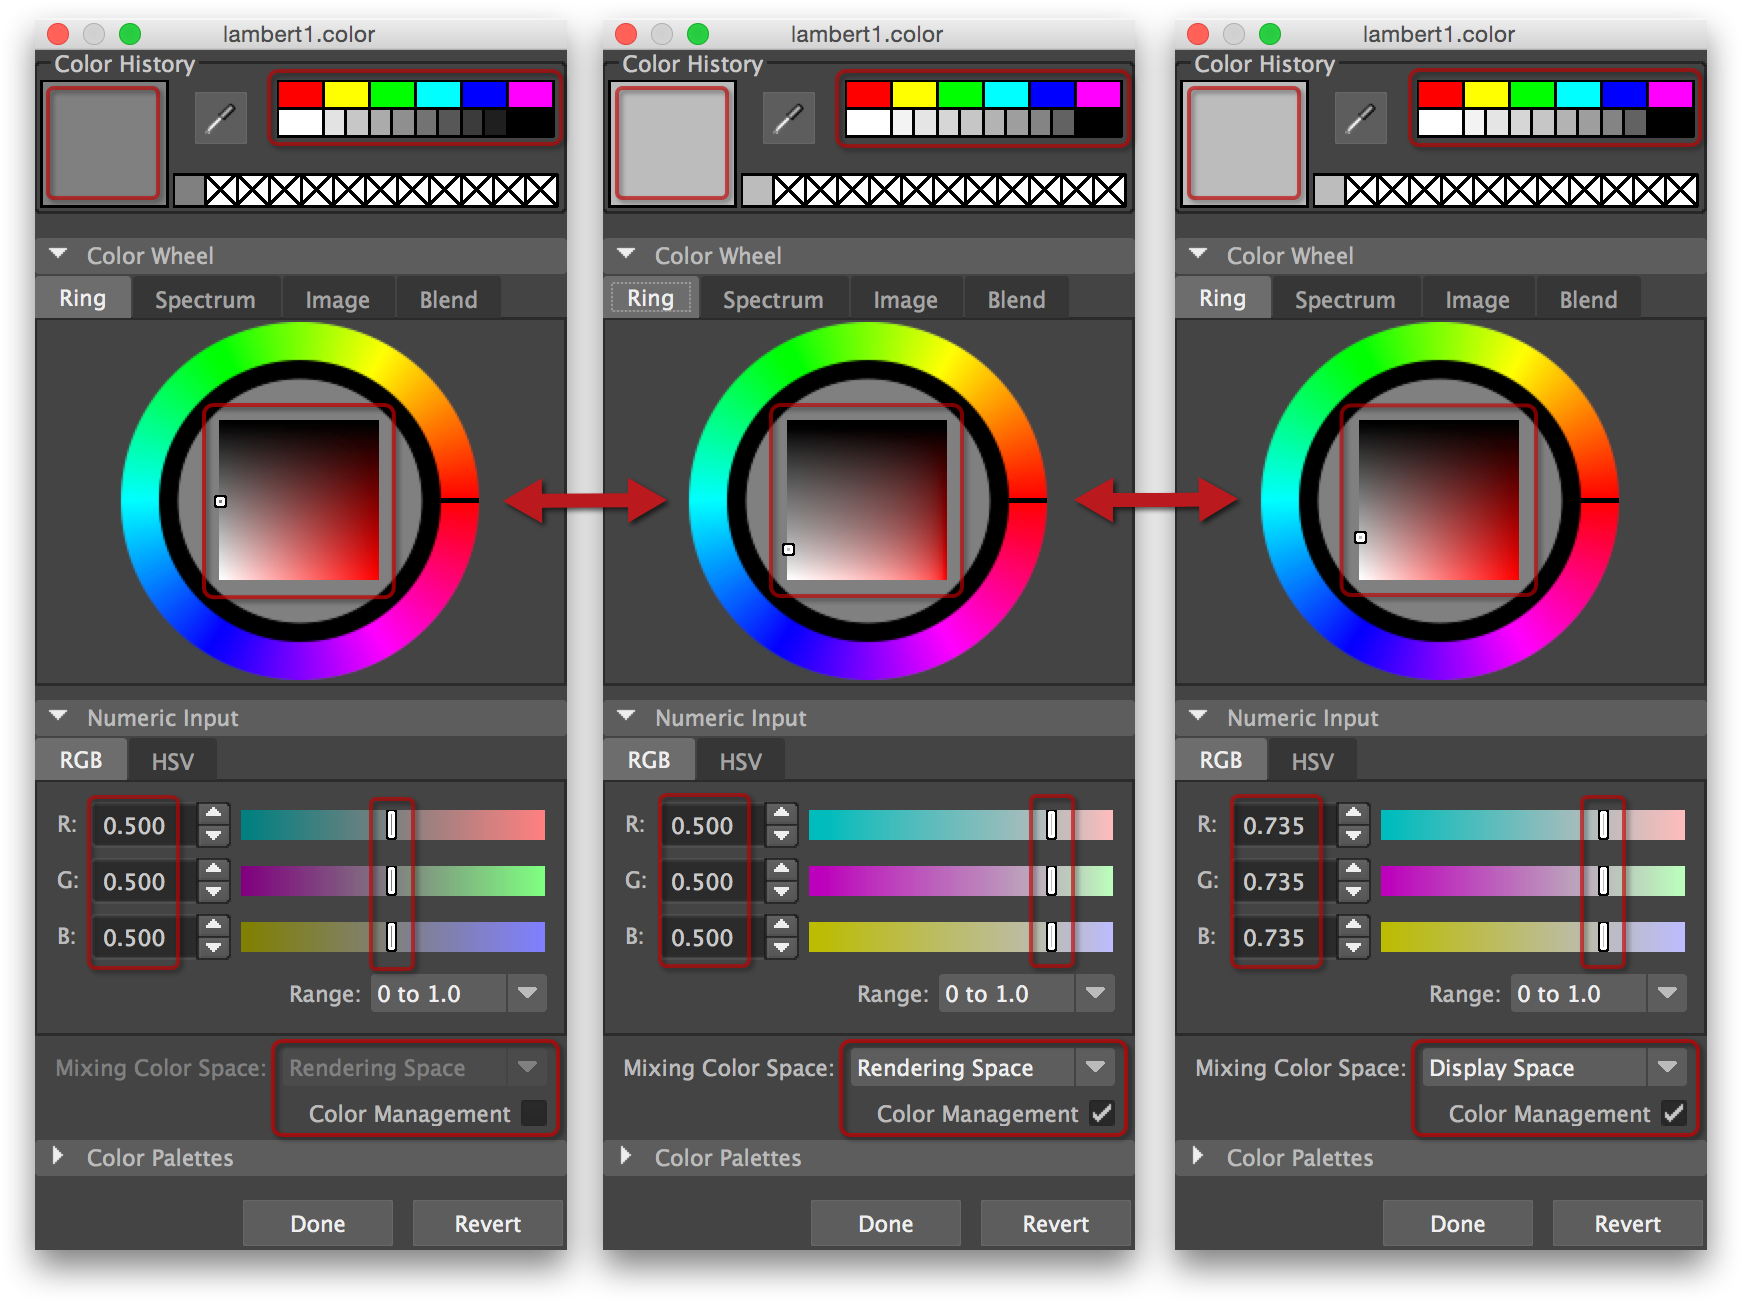
The same 50% gray colour attribute value displayed with Color Management disabled (left); Color Management enabled and Mixing Color Space set to Rendering Space (middle), and Color Management enabled and Mixing Color Space set to Display Space (right). Some important differences are highlighted.


Changing the Color Management toggle or the Mixing Color Space has an effect most elements of the Color Chooser, including the large current color square in the upper left corner, the color palettes (in the upper right corner and in the lower section), the gradient square in the Ring Color Wheel, the numeric values displayed in the Numeric Input section and the sliders in that section too. The table below summarizes the effects of these two controls. 

 Color Management OffColor Management On
Mixing Color Space: Rendering SpaceMixing Color Space: Display Space
Selected colour renders as it looksNoYesYes
Natural control of sliders and gradientsYesNoYes
Actual attribute values displayed in the numeric fieldsYesYesNo
Color Management Off

The Color Chooser will appear like the left image above.

  • Sliders and gradients are linear, which makes their manipulation more natural;
  • The numeric values displayed in Numeric Input are the actual attribute values;
  • The selected color will not render as it looks in the current color square, in the upper left corner.
Use this setting when:
  • You want to set a colour attribute to a specific numeric value, for use in a displacement shader, bump node or anisotropic direction, for instance.
Do not use this setting when:
  • You want to choose a color by its look on screen. It will not render as it appears in the current color square.
Rendering Space as the Mixing Color Space (Color Management On)

The Color Chooser will appear like the middle image above.

  • Sliders and gradients are exponential; a very large range will be dedicated on smaller values. In thew example above, about 20% of the control ranges cover values from 0.5 to 1.0. This can make adjusting a value tricky;
  • The numeric values displayed in Numeric Input are the actual attribute values;
  • The selected color will render as it looks in the current color square, in the upper left corner.
Use this setting when:
  • You want to choose a colour by its look on screen; it will render as it appears in the current color square;
  • You want to set a colour attribute to a specific numeric value, for use in a displacement shader, bump node or anisotropic direction, for instance;
  • In other words, this is a good setting for all cases, provided you can live with the non-linear controls.
Do not use this setting when:
  • You require precise slider or gradient control over larger values (above 0.5).
Display Space as the Mixing Color Space (Color Management On)

The Color Chooser will appear like the right image above.

  • Sliders and gradients are linear, which makes them more natural to use;
  • The numeric values displayed in Numeric Input are not the actual attribute value. The values shown are the attribute value, converted to the display colour space.
  • The selected color will render as it looks in the current color square, in the upper left corner.
Use this setting when:
  • You want to choose a colour by its look on screen and you want linear slider & gradient controls; it will render as it appears in the current color square;
Do not use this setting when:
  • You want to set a colour attribute to a specific numeric value, for use in a displacement shader, bump node or anisotropic direction, for instance. The numeric values displayed are not the raw attribute values.


Suggested Color Chooser settings combinations

Since there is no single perfect combination of settings, some possible workflows would be:

Use Rendering Space as the Mixing Color Space for everything.

  • Turn on Color Management and set Mixing Color Space to Rendering Space

You will have to learn to live with the sometimes awkward slider / gradient adjustments, but this setting works for picking a colour by its looks on screen and for setting a colour to a specific numeric value. You don't have to remember to change a setting before and after setting a colour value to a specific numeric value.

Use Display Space as the Mixing Color Space in general, and turn off Color Management for editing select colour attributes.

  • Set the Mixing Color Space to Display Space; 
  • Turn off Color Management when you must set a color attribute to a specific numeric value (for displacement or bump shading, or anisotropic direction);
  • Turn on Color Management the rest of the time. 

You will have linear sliders and gradients all the time, but you will have to remember to change a setting before and after editing a color set to a specific numeric value. The two states are a bit more obvious than changing the Mixing Color Space value, which can help to spot a forgotten, incorrect state of the Color Management toggle.

Using the compact Color Chooser (single left click on a colour gadget), you can turn off Color Management, set your numeric values, then turn back on Color Management so you will not forget to do so later. The attribute values entered in the numeric filed will remain effective. For some reason, the large Color Chooser (double-click on a color gadget) behaves differently; changing the Color Management setting reverts the attribute to its value before the Color Chooser was displayed.


Viewport Settings

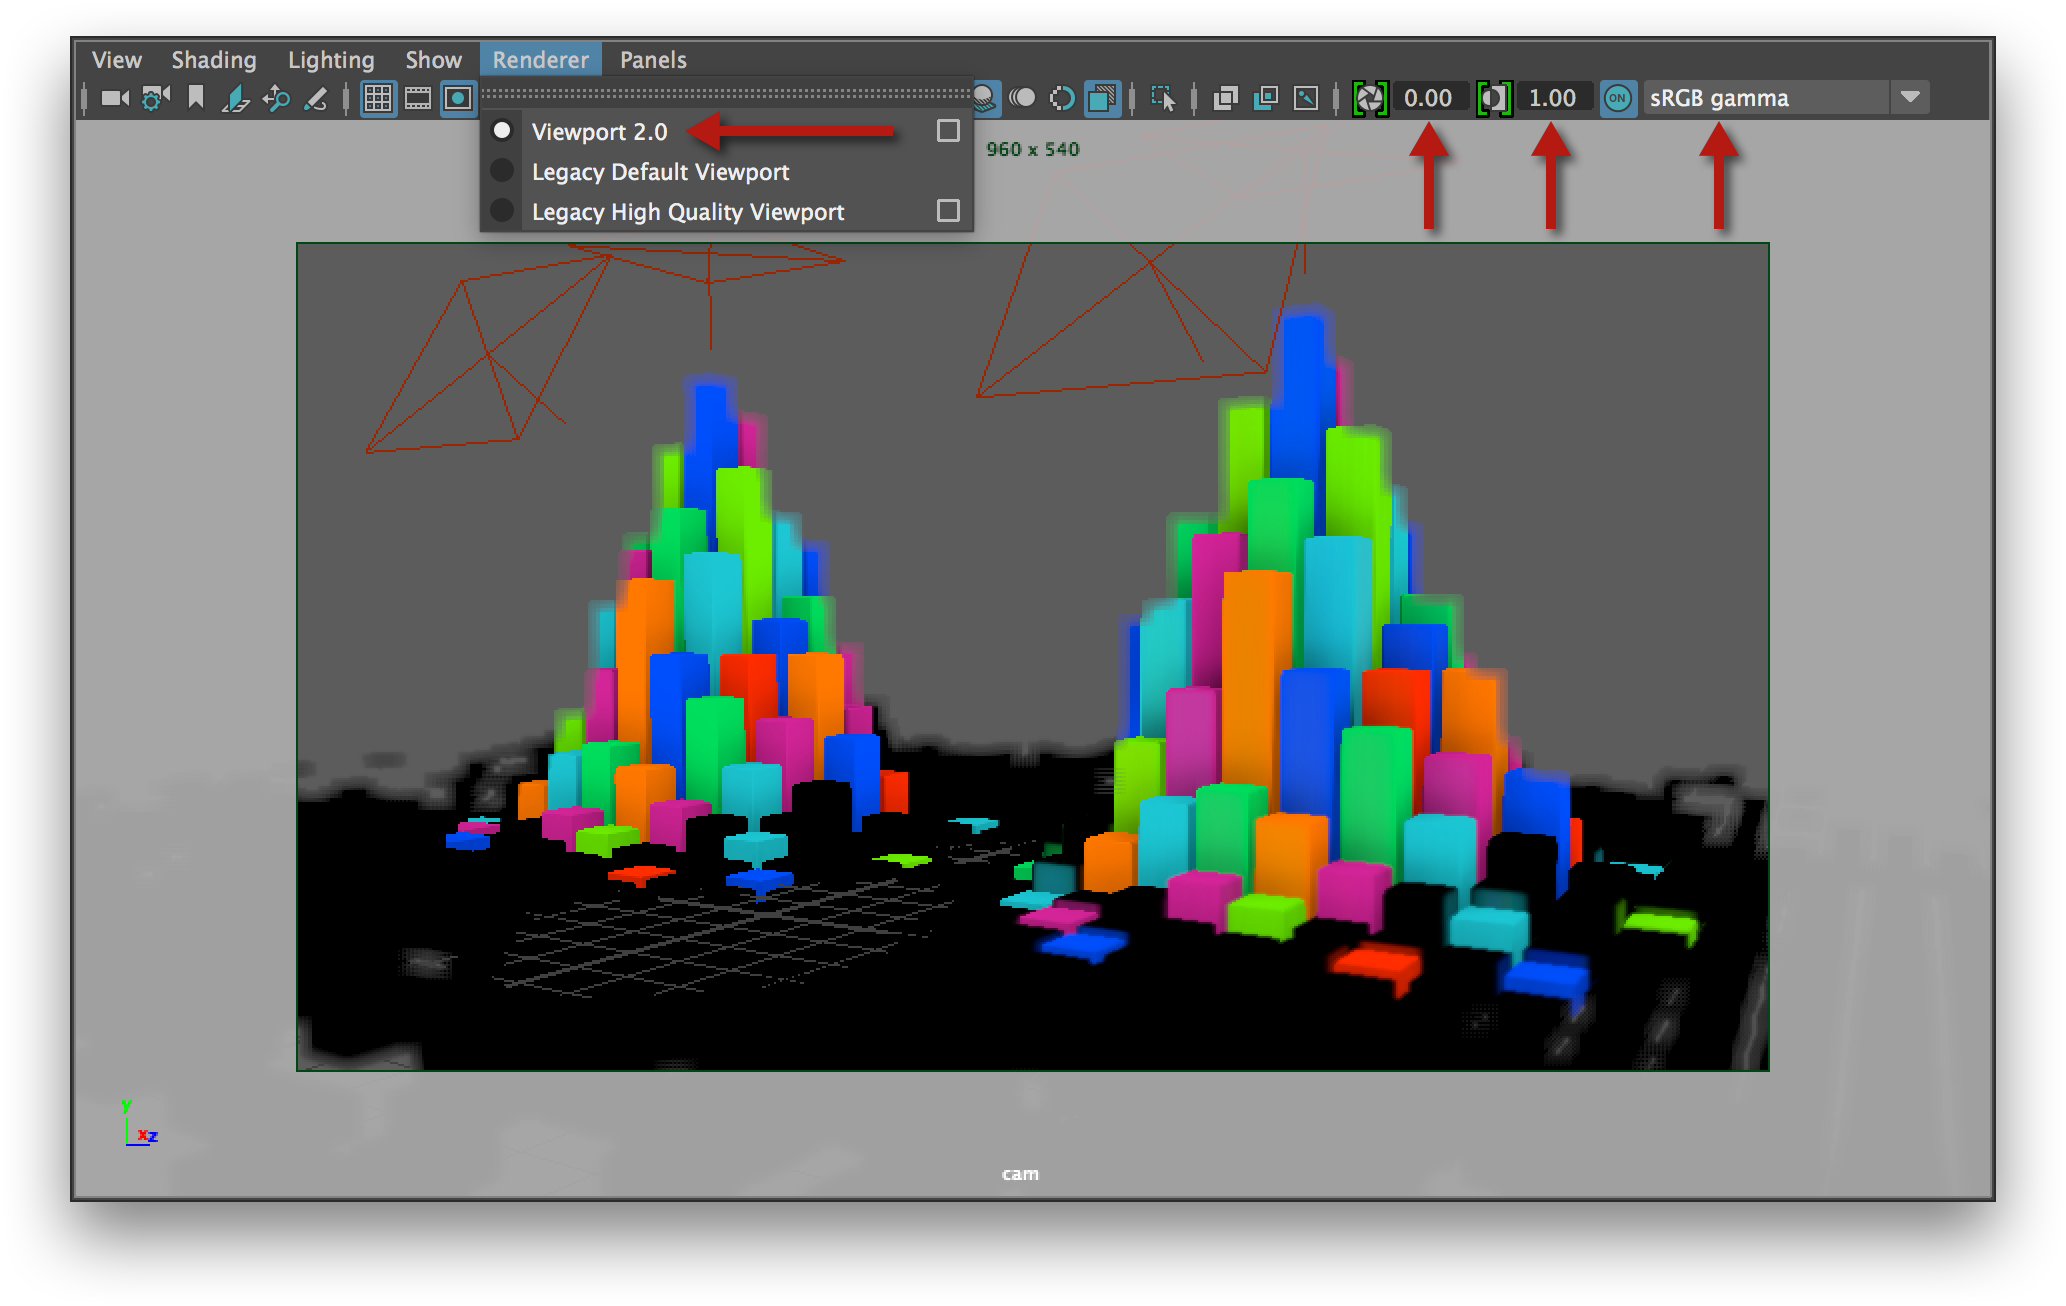
The Viewport, with important colour management settings highlighted.


  • In the Viewport'sRenderer menu, make sure that Viewport 2.0 is selected (this is the default). 

    Only the Viewport 2.0 renderer supports colour management; choosing any legacy viewport renderers will be displayed with a linear gamma and make the Viewport gamma option menu insensitive.


  • The Viewport rendering will have the gamma correction applied as specified by the View Transform setting in the Color Transform Preferences. You can temporarily override this setting in the option menu at the right end of the Viewport toolbar.
  • You can change the Exposure value (default is 0.0) and the Gamma value (default is 1.0), but do not use these settings as a replacement of the proper value for the View Transform. In other words, it is preferable to pick sRGB gamma for the View Transform and leave Gamma at 1.0 instead of trying to use a Gamma value of 2.2 to emulate the sRGB gamma curve.

The Exposure, Gamma and View Transform settings of the Viewport toolbar are temporary. Their values are not saved with the scene. Upon an New Scene / Open Scene event, they are reset to their default value.


 Render View Settings

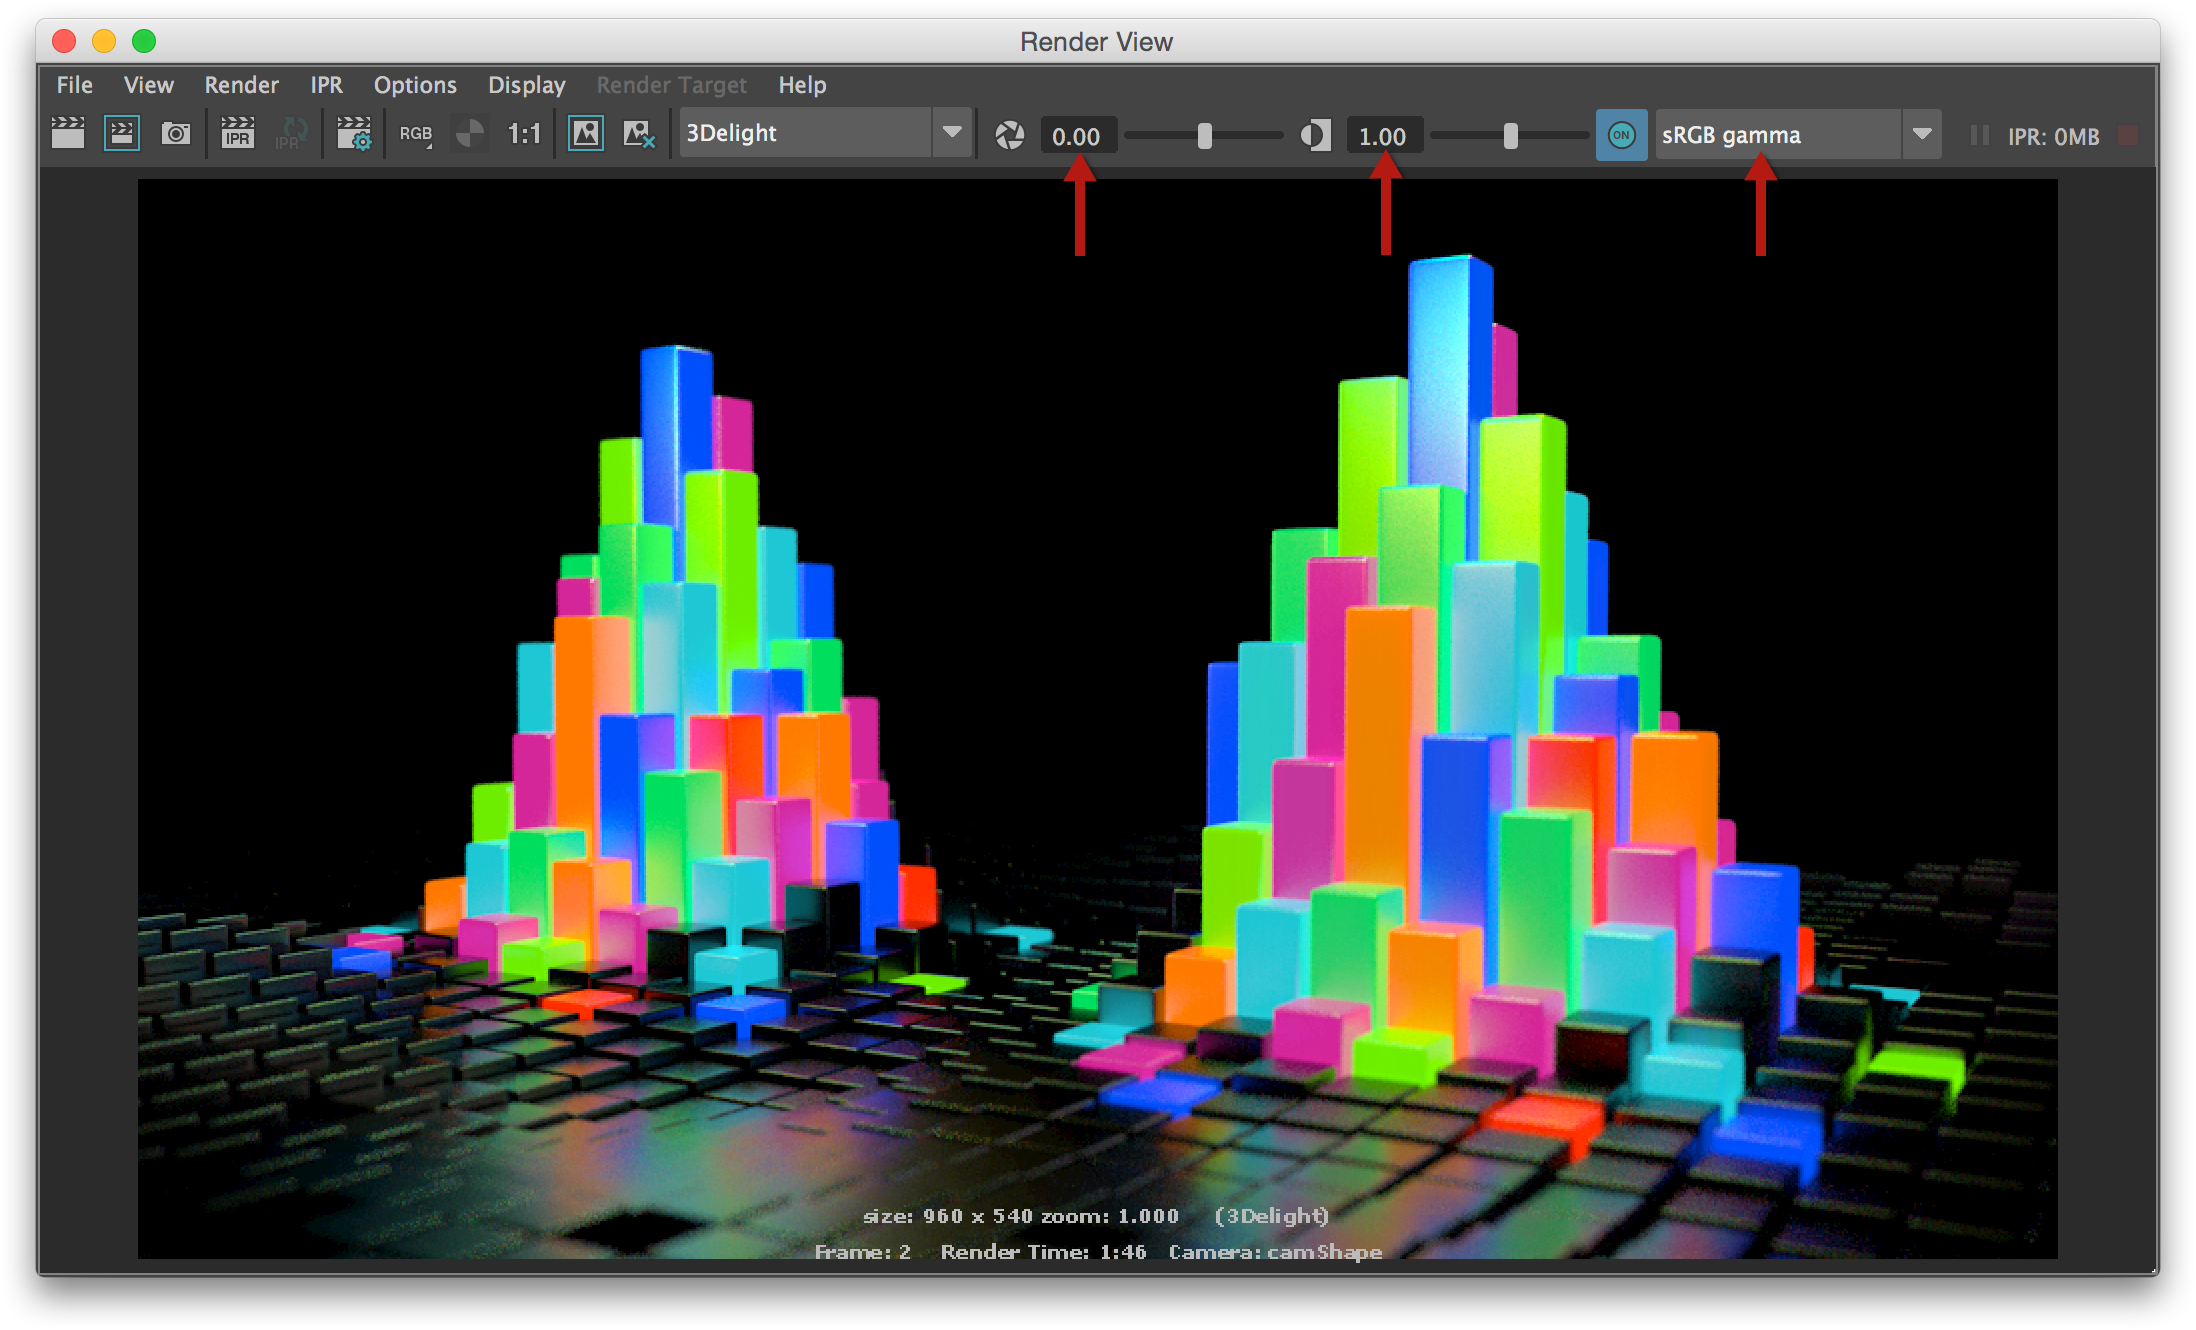
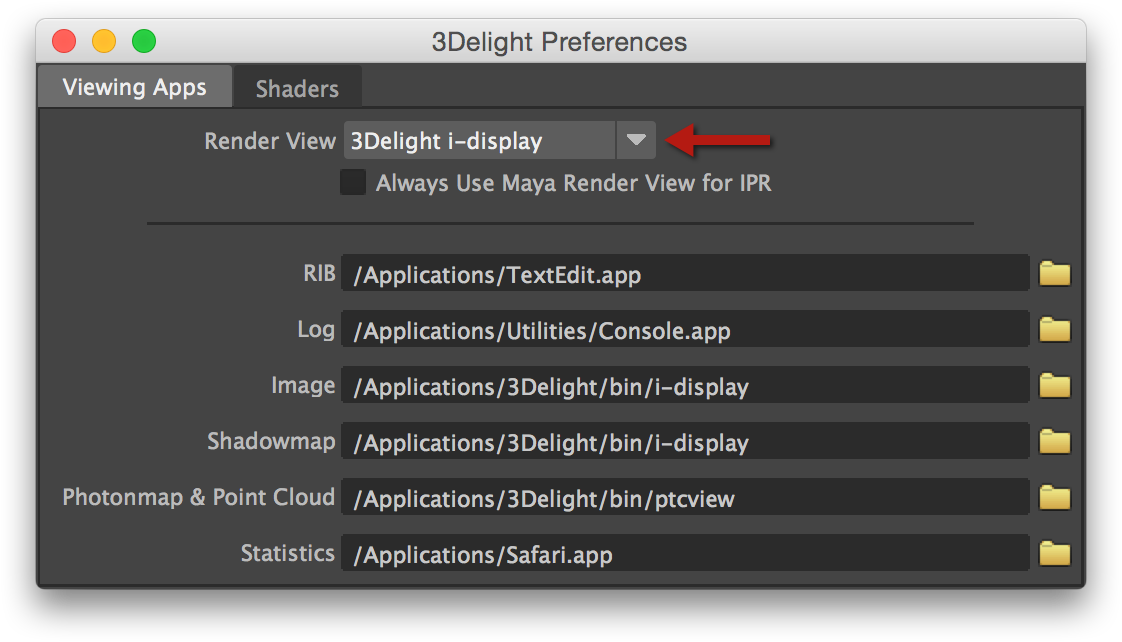
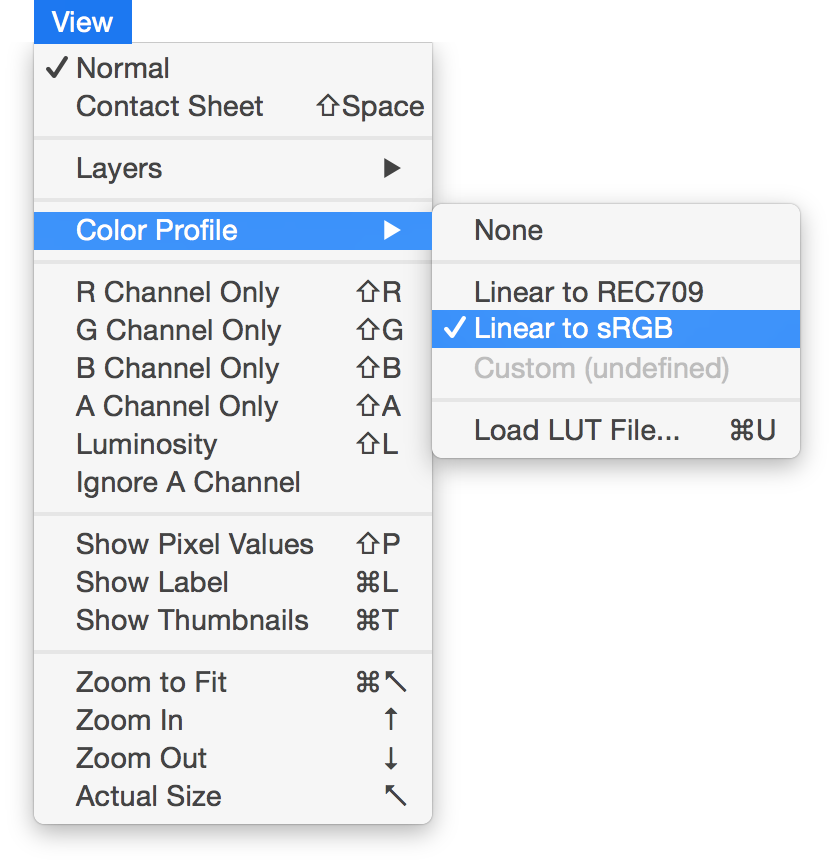
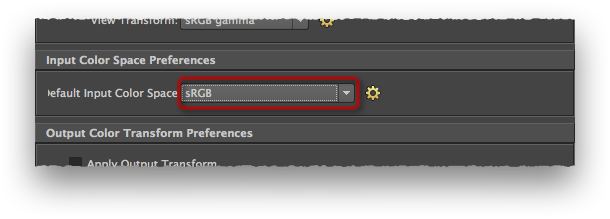
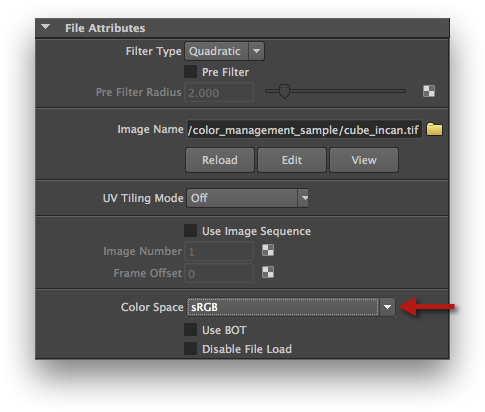
The Render View, with important colour management settings highlighted.


  • The Render View will apply a gamma correction on the rendered image as specified by the View Transform setting in the Color Transform Preferences. You can temporarily override this setting in the option menu at the right end of the Viewport toolbar. 
  • You can change the Exposure value (default is 0.0) and the Gamma value (default is 1.0), but do not use these settings as a replacement of the proper value for the View Transform. In other words, it is preferable to pick sRGB gamma for the View Transform and leave Gamma at 1.0 instead of trying to use a Gamma value of 2.2 to emulate the sRGB gamma curve. 

The Exposure, Gamma and View Transform settings of the Render View toolbar are really temporary. Their values are not saved with the scene. In fact, they are not kept anywhere - if you close the window, these setting values are discarded.

i-DIsplay Settings

The 3Delight Preferences window.


  • In the 3Delight Preferences window, set the Render View setting to 3Delight i-Display.


The View → Color Profile menu in i-Display.

  • In i-Display (you can do a render in Maya to launch it), set the correct color profile for your setup in View → Color Profile.

Texture File Settings (Maya 2015 Extension)

In this Maya version, the texture color space options are more primitive. You can define a Default Input Color Space  in the preferences. When you create a new texture node, such as the File 2D Texture node, its Color Space attribute will be set to the value defined by the Default Input Color Space preference. You can manually override this setting for each texture node.

3Delight for Maya supports the following Input Color Spaces:

  • camera Rec 709
  • gamma 1.8 Rec 709
  • gamma 2.2 Rec 709
  • gamma 2.4 Rec 709 (video)
  • Raw
  • scene-linear CIE XYZ
  • scene-linear DCI-P3
  • scene-linear Rec 2020
  • scene-linear Rec 709 / sRGB
  • sRGB


The Input Color Space Preferences section in Maya 2015 Extension.

  • In the Color Management section of the Maya Preferences, set the Default Input Color Space to the most commonly used one by your project's texture files.


The Color Space setting of a File 2D Texture node in Maya 2015 Extension.

  • In a texture node, such as a File 2D Texture node, adjust the Color Space attribute to the correct value for your texture. By default, for newly created nodes, it is set to the Default Input Color Space preference.

Modifying the Default Input Color Space will only affect texture nodes created after the preference change.

Texture File Settings (Maya 2016 and newer)

Setting Up Texture File Rules

The Color Management section of the Maya Preferences window contains a Input Color Space Rules section. You can define here associations between a texture color profile and file name patterns and extensions.

The Input Color Space Rules are saved as per-user preferences. They remain valid across all scenes.


The Input Color Space Rules section, in the Color Management Maya Preferences.


  • In the rules list, select the Default entry. Make sure its Input Color Space setting is set to a profile that fits most of your project's textures.


Creating a "hdr" texture rule.

  • If you are using HDR images in your project, you can add a rule so that Maya and 3Delight know they have a linear gamma:
    • Click Add and enter a rule name - "hdr" for instance.
    • Set Image Extension to "hdr". Note that the extensions are case-sensitive; if you use both the ".HDR" and ".hdr" extensions, you will need to define two distinct rules, or use an Image Name Pattern.
    • Set Input Color Space to Raw.
  • If your scene already contains File 2D Texture nodes, you can click Reapply Rules to Scene. This will change the Color Space attribute of all nodes using texture files.

You can define other files rules as needed by your project. 3Delight for Maya supports the following Input Color Spaces:

  • camera Rec 709
  • gamma 1.8 Rec 709
  • gamma 2.2 Rec 709
  • gamma 2.4 Rec 709 (video)
  • Raw
  • scene-linear CIE XYZ
  • scene-linear DCI-P3
  • scene-linear Rec 2020
  • scene-linear Rec 709 / sRGB
  • sRGB

Texture Nodes Settings

A portion of the File 2D Texture Node attributes.

  • Selecting an image in texture file nodes such as the File 2D Texture node or the PSD File node will automatically adjust its Color Space attribute based on the Input Color Space rules defined above.
  • Once the image file is selected, you can manually override the Color Space setting made by the rules application. The supported Color Space values are listed above.

  • No labels